Dinner

Sweet Potato Toasts with Crispy Mushrooms and Tahini

IMG_2943.jpeg

Keeping in theme with the Ingredient of the Week (sweet potatoes), I made these super easy and tasty sweet potato toasts with crispy mushrooms and tahini! What’s better than a 3-ingredient meal? I’ll make two of these and a side salad for a fresh, flavorful, and colorful lunch!

Ingredients:

  • 1 large sweet potato, sliced into ¼ inch slices, lengthwise

  • 12 ounces of mushrooms, sliced

  • 3-4 tbsp. avocado oil

  • Salt and pepper to taste

  • Tahini and sea salt to top

  • 1 tbsp. fresh thyme (optional)

Directions:

  • Preheat oven to 400 degrees

  • Coat with half of the avocado oil and a sprinkling of salt and pepper

  • Place on baking sheet and place in the oven

  • After 12 minutes, flip the “toasts”

  • Roast for 12 more minutes or until browned and the flesh is soft when touched with a fork

  • As “toasts” are in the oven, cook the mushrooms over medium-high heat with the remainder of the avocado oil and a healthy pinch of salt and pepper. Add in thyme if using too. Stir frequently until the mushrooms are cooked and crispy (about 8-10 minutes)

  • Once the “toasts” are out of the oven, top them with mushrooms, and drizzle tahini on top. Finish with a pinch of sea salt.

Stuffed Sweet Potatoes with Chickpeas, Spinach, Tomatoes, and Feta

IMG_2841.jpeg

These Mediterannean-inspired stuffed sweet potatoes are a burst of flavor and make for a surprisingly filling and substantial meal. It’s a bright and colorful dish, loaded with nutrient-dense ingredients, and has a flavor combination of salty and sweet. They are stuffed with chickpeas, spinach, tomatoes, and feta cheese and really couldn’t be easier to prepare! 

Ingredients:

(serves 2)

  • 2 medium sweet potatoes

  • 1 cup canned chickpeas, rinsed and drained

  • 2 cups spinach

  • ¼ cup cherry tomatoes, diced

  • 2 cloves of garlic, minced

  • ½ yellow onion, diced

  • 1 tsp cumin

  • Salt and pepper

  • 1 tbsp olive oil

To top:

  • ¼ cup of crumbled feta

  • ¼ cup of chopped parsley

  • Balsamic glaze (optional)

Directions:

  • Preheat oven to 400 degrees F. 

  • Poke each sweet potato a few times with a fork and place them on a lined baking sheet. Bake for 45 minutes to an hour, or until tender.

  • While sweet potatoes cook, heat a large skillet over medium heat and add in the olive oil, onion, and a pinch of salt. Cook until translucent (about 5-8 minutes). Add garlic and continue cooking for 2-3 minutes or until fragrant. Add chickpeas, cumin, salt and pepper. Stir to combine and cook for 10 minutes, or until chickpeas start to get a bit crispy.

  • Add in the spinach and continue to cook until the greens are wilted (just a few minutes). 

  • When sweet potatoes are ready, cut the center of the potatoes open and use a fork to gently mash the inside. Place a couple heaping spoonfuls of the chickpea mixture in the sweet potatoes. Top with cherry tomatoes, feta cheese, parsley, and a drizzle of balsamic glaze. 

Grilled Salmon Tacos with Guacamole and Mango Salsa

08853ACA-9A4C-443A-AE02-3A50228337A8.JPG

I am obsessed with these tacos! They are bright and colorful and loaded with powerful Omega-3s. The smooth and creamy guacamole, charred salmon, and zesty mango salsa makes this a fun, festive, and delicious summer meal! Plus, it’s really easy and quick to prepare!

Ingredients:

(serves 4)

For the salmon

  • 1 1/2 lbs boneless salmon (wild-caught preferred)

  • 1 tbsp avocado oil, plus more for grill (optional)

  • 1 ½ tsp ancho chili powder

  • 1 ½  tsp ground cumin

  • 1 tsp salt 

  • 1/2 tsp pepper

  • 8 tortillas (I use Siete chickpea flour tortillas

For the guacamole:

  • 3 ripe avocados

  • Juice from one lime

  • Salt to taste

For the mango salsa:

The guac and salsa!

The guac and salsa!

  • 2 ripe mangos, peeled, pitted, and diced

  • ½ cup cherry tomatoes, quartered

  • ¼ cup diced red onion

  • 1/4 cup fresh chopped cilantro

  • Juice from one lime

  • Salt and pepper to taste

Directions:

  • Preheat your grill to medium-high heat.

  • While your grill heats up, whisk together avocado oil, chili powder, cumin, salt and pepper. Rub the mixture all over the salmon.

  • Brush some extra avocado oil on the grill grates and then grill the salmon for about 4-5 minutes per side.

  • While the salmon is cooking (or beforehand), prepare your guacamole and salsa. For the guacamole, mash the avocado with lime juice and salt. For the mango salsa, combine all ingredients in a bowl. 

  • When salmon is finished cooking, heat your tortillas on the grill grates.

  • Assemble tacos with the guacamole, salmon, and salsa and enjoy!

* Helpful Tip for grilling salmon - https://www.foodiecrush.com/best-grilled-salmon/ 

Health Benefits of Salmon:

  • Salmon is one of the best sources of Omega-3 fatty acids, which boosts brain function, reduces inflammation, and lowers blood pressure.

  • Salmon is one of the best food sources for Vitamin D, which we need for absorbing calcium and phosphorus and keeping a strong immune system.

  • It is a rich source of selenium, a trace mineral needed to protect bone health and for healthy thyroid function.

  • The Omega-3s and antioxidants in salmon can help keep skin healthy and bright.

  • Salmon is high in essential B-vitamins, which helps turn food ingested into energy, reduces inflammation, and helps our brain and nervous systems to function optimally. 

Sources and Additional Reading:

Tuscan White Bean Stew with Sweet Potatoes and Kale

IMG_2581.jpeg

This Tuscan White Bean Stew with Kale and Sweet Potatoes is a new weekly staple for me. I make a big batch on a Sunday and have it for lunches throughout the week. It is cozy, comforting, and nutritious! The first time I had a Tuscan White Bean Soup, I was visiting a vineyard chateau in Chianti with my dad when he visited me during my semester abroad in Italy. I vividly remember that lunch where we enjoyed this incredibly hearty stew, that was so simple and rustic, yet complex in flavor. Our steaming hot soups were served with crusty bread and a glass of delicious red wine. Every time I have this soup, I am reminded of that amazing day. Now, I have created my own rustic version, with the addition of kale and white beans for some added flavor and vegetables. While the parmesan rind is optional, it is highly recommended. The flavor that it brings is pretty incredible!

Ingredients:

(Serves 4)

  • 2 tbsp olive oil 

  • 1 yellow onion, diced

  • 3 cloves of garlic, minced

  • 1 large sweet potato, diced

  • ½ head of fennel (or 2 celery stalks), diced

  • 1 15 ounce can of cannellini beans, rinsed and drained

  • 2 sprigs of rosemary

  • 4 cups vegetable broth

  • 4 cups kale, chopped 

  • 1 rind of parmesan cheese (optional) 

  • Pinch red chili pepper flakes

Directions:

  1. Heat oil in a large pot over medium heat. Add onion and cook for about 5-8 minutes, or until they are translucent and soft.

  2. Add the garlic and fennel and cook for 5 minutes, or until vegetables are beginning to soften.

  3. Add sweet potatoes and broth and bring to a boil.

  4. Bring soup to a simmer, and add the rosemary sprigs, parmesan rind, and cannellini beans. Add a pinch of red pepper flakes and set the lid on the pot for 20-25 minutes or until sweet potatoes are soft when pierced with a fork.

  5. Remove rosemary sprigs and parmesan rinds. Add in kale and cook for another few minutes, or until kale has softened.

  6. Serve with fresh parmesan cheese and crusty bread (optional).

* Feel free to add in some ground sausage for an even heartier version.

For the health benefits of kale, check out my recipe for Mustardy Kale Salad.

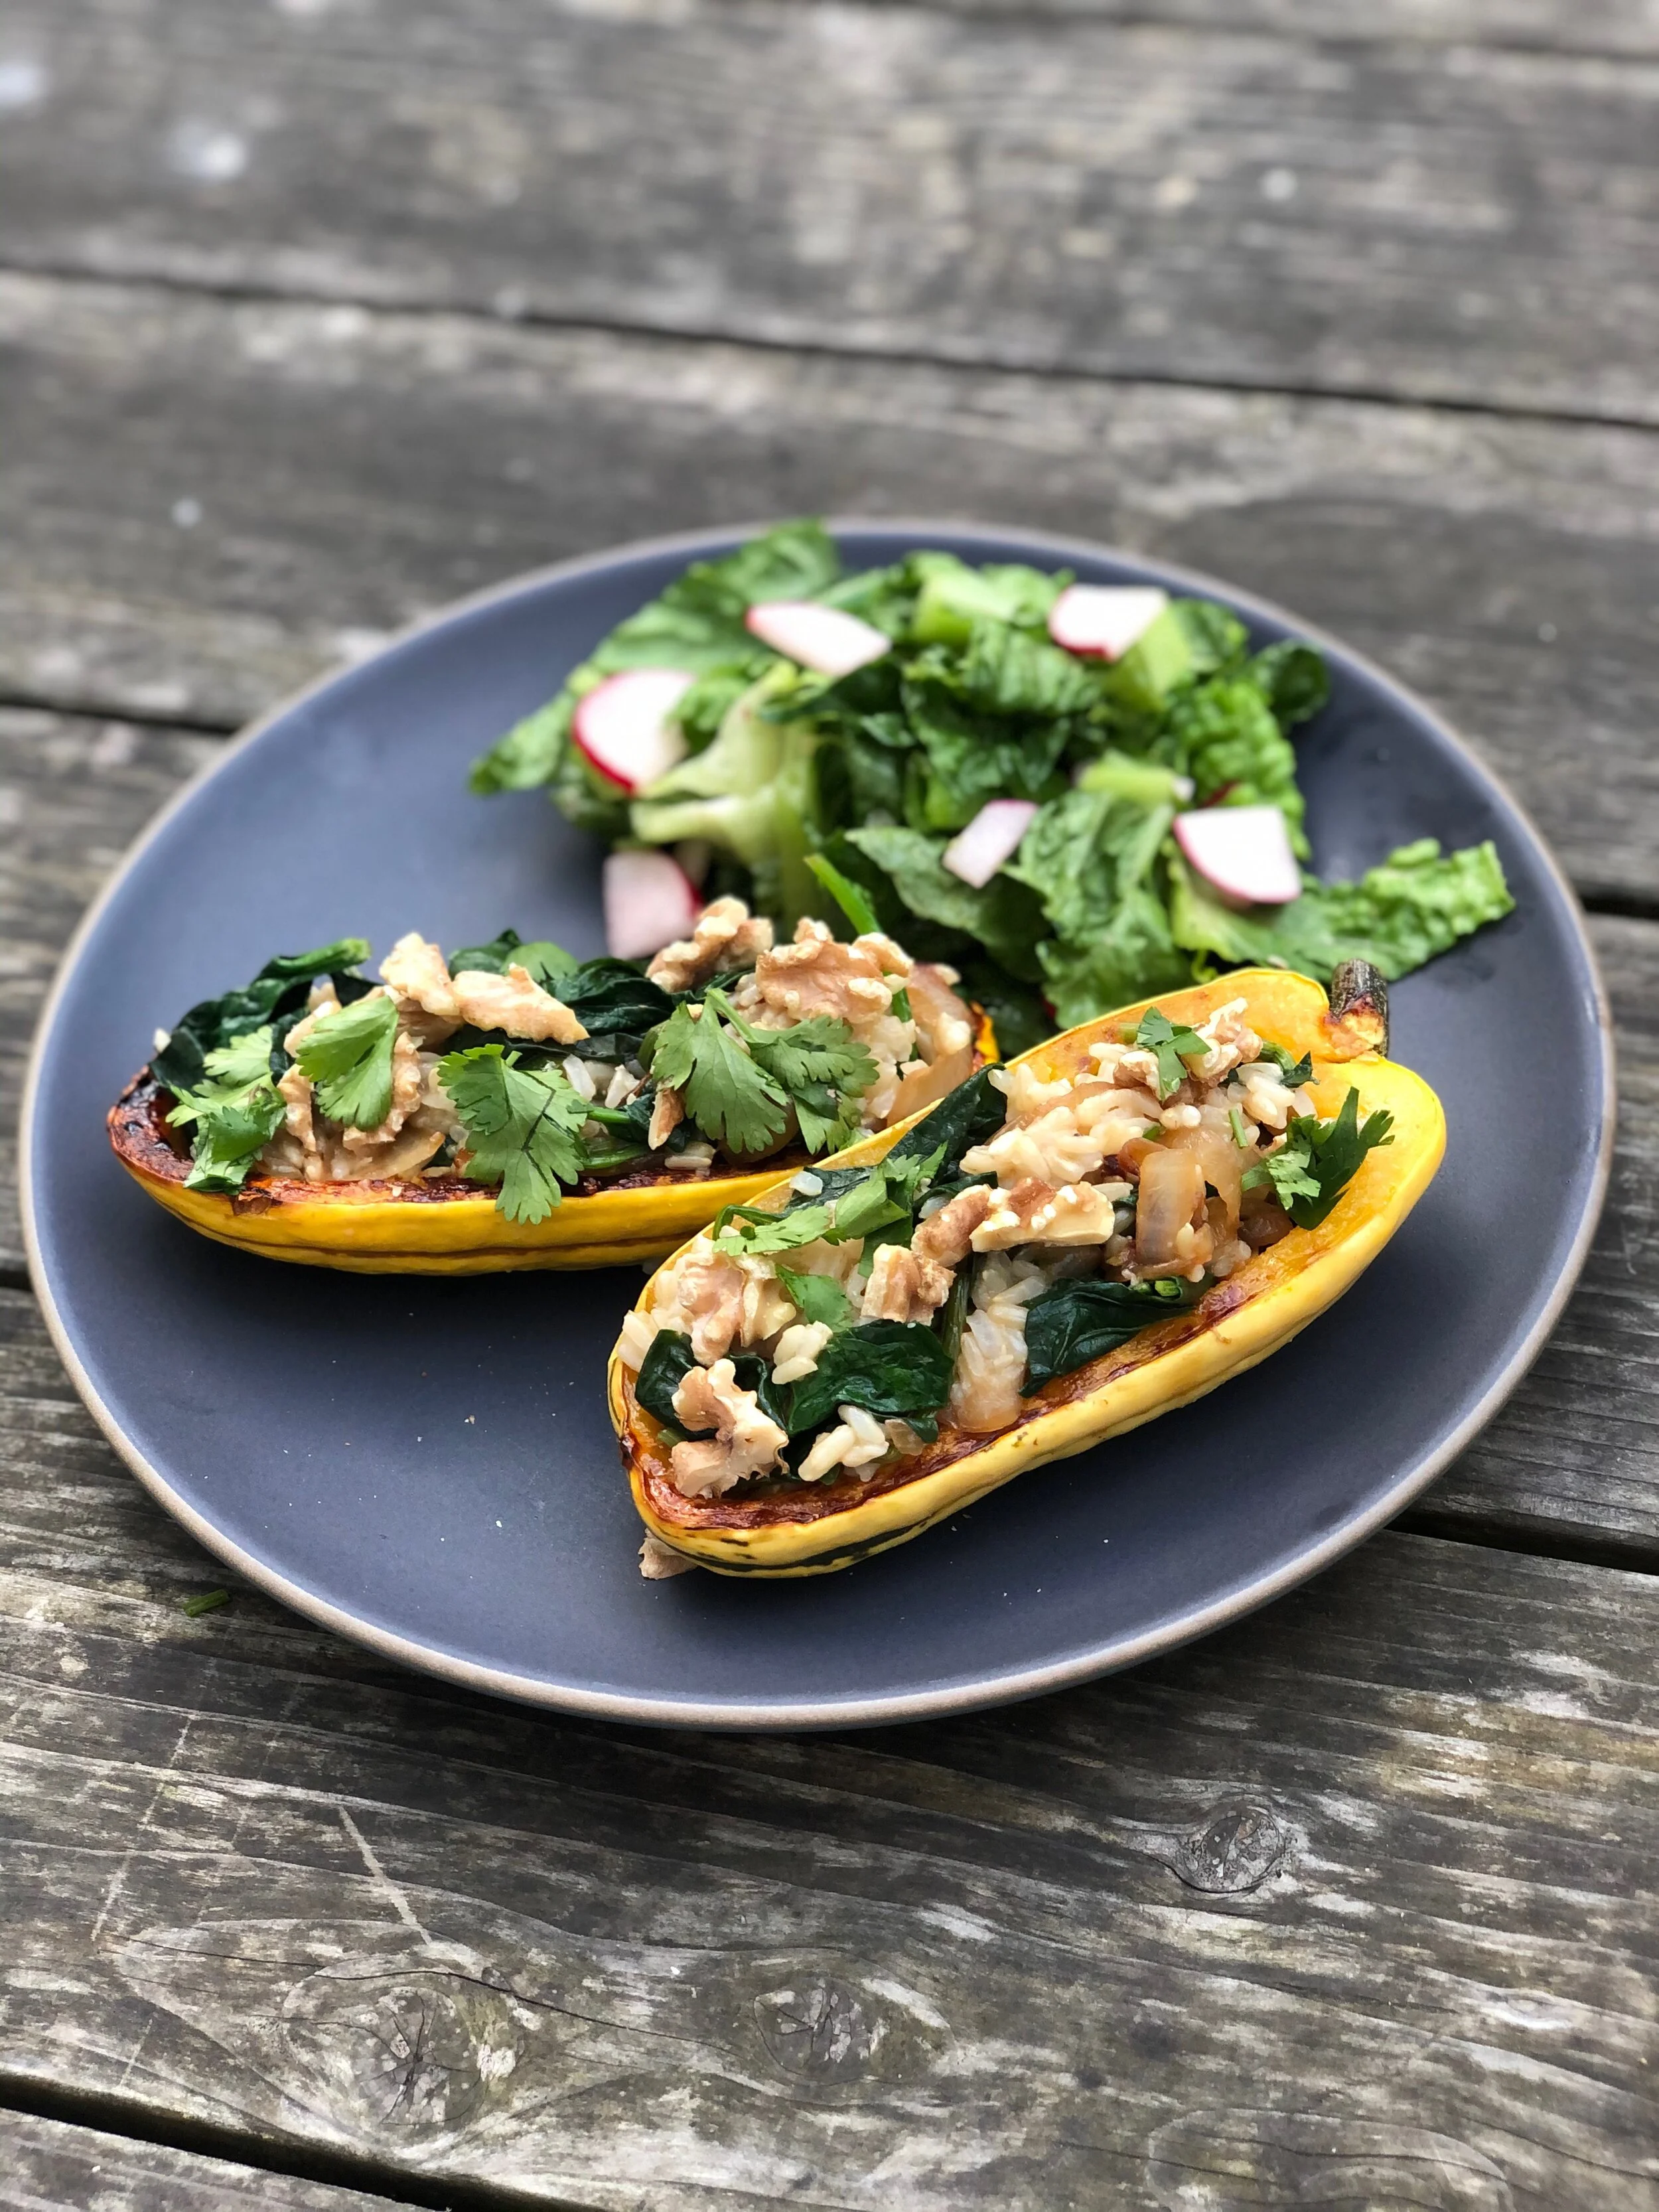
Delicata Squash stuffed with Brown Rice, Caramelized onion, Spinach and Toasted Walnuts

IMG_2625.jpeg

I have been cooking with delicata squash a decent amount during shelter-in-place since we are limiting trips to the grocery store and they have a long storage life. I’ve experimented with stuffed squash (I even posted a recipe about a month ago) and I am really loving them! Using whatever you have on hand, you can create delicious combinations! This one is so tasty, and I love how the toasted walnuts compliment the nuttiness of the brown rice. I plan to make this over and over again. Enjoy!

Ingredients:

(serves 2 as a main or 4 as a side)

  • 2 delicata squash

  • 1 cup brown rice, rinsed

  • 1 yellow onion, sliced 

  • 4 cups spinach 

  • ¾ cup walnuts, toasted

  • 1 tbsp butter

  • 2 tbsp avocado oil

  • ¼ cup olive oil

  • 3 tbsp red wine vinegar

  • 1 clove of garlic, smashed

  • Salt and pepper to taste

Directions:

  • Preheat oven to 400 degrees F

  • Cook brown rice according to package directions.

  • Prepare the squash by cutting off the ends, slicing lengthwise and removing the seeds. Coat the squash with avocado oil and sprinkle with salt and pepper. Roast for 35 minutes, or until golden brown and tender.

  • In a pan over medium heat, saute onion in butter and a pinch of salt, stirring every so often until caramelized, which will take about 25 min. Deglaze pan with 1 tbsp of red wine vinegar. Add spinach to the pan and cook until wilted. Remove from heat.

  • Make vinaigrette with olive oil, 2 tbsp red wine vinegar, garlic, and salt and pepper to taste.

  • Pour vinaigrette over cooked brown rice and then add spinach and onion. Stir to combine. Stuff squash with brown rice mixture  and top with walnuts.

  • Optional: Garnish with fresh parsley 

Slow Cooked Shredded Chicken

IMG_2549.jpeg

Chicken is an excellent source of lean protein, plus it’s versatile and easy to cook with. You can add it to stir frys, tacos, soups, have it grilled, roasted, poached, slow cooked, and seared in a pan. During shelter in place, this Slow Cooked Shredded Chicken recipe has become a weekly staple in our household. With it, we almost always create brown rice taco bowls with whatever ingredients we have on hand, like beans, sauteed greens, avocado, and salsa. While it takes a little time to make (though it’s very hands-off), the amazing flavor it produces is completely worth the effort!

When buying chicken, look for organic and/or pasture-raised because those chickens are never introduced to hormones or antibiotics and are given space to roam. There’s a lot of confusion about packaging lingo and if you want to know more, check out the first two links in “Sources and Additional Reading” at the bottom of this post.

Ingredients:

  • 4 boneless, skinless chicken breasts, salted and brought to room temperature (an assortment of chicken pieces will also work - including legs, thighs, etc…)

  • 1 yellow onion, diced

  • 4 cloves of garlic, minced

  • 2 ½ tsp cumin

  • 1 ½ tsp chili powder

  • 1 tsp salt

  • 2 cups chicken broth

  • 2 tbsp olive oil


Instructions:

served as part of a taco bowl

served as part of a taco bowl

  • Preheat oven to 325 degrees F.

  • In a Dutch oven, saute onions with a pinch of salt in olive oil over medium heat until soft, about 8 minutes.

  • Add garlic, cumin, chili powder, and remaining salt and stir for a minute.

  • Add the chicken breasts and chicken broth and bring to a simmer. Then cover with Dutch oven with a lid and place in the oven for 1.5 hours.

  • Remove from the oven and shred chicken with two forks. 

    * IF you have a slower cooker, throw all the ingredients in there and cook on low for 6-8 hours or on high for 3-4.

    *Serving suggestions: Top a brown rice bowl with this shredded chicken or use it as a filler for tacos!

Here are some health benefits of including chicken in your diet:

  • Chicken is an excellent source of protein, which we need to build muscles, to build and repair tissues, and to make enzymes and hormones.

  • Chicken is abundant in selenium, which is essential for hormone health, a healthy metabolism, thyroid function, and immune functioning.

  • Eating chicken (and meat in general) helps boost our Vitamin B6 intake, which we need to keep blood vessels and metabolism functioning well and our energy levels high.

  • Chicken has both tryptophan and Vitamin B5, which create a calming effect in our body and can be helpful in reducing stress.


Sources and Additional Reading:

Sweet Potato and Quinoa Veggie Burgers

IMG_2523.jpeg

I made these veggie burgers the other night with some pantry ingredients and sweet potatoes and they were SO delicious, flavorful, and filling. Even my husband, who was not too psyched about the idea of veggie burgers, was super into these! This recipe is easy and quick - perfect for a Meatless Monday or any day you feel like cooking without meat. And I am loving having the leftovers heated up for lunch this week!

Quinoa is cooked frequently in our household, as it’s a gluten-free grain/seed that is high in protein, high in fiber, and is a great source of antioxidants. To read more about the health benefits, check out my recipe for Savory Quinoa Breakfast bowl on my website!

Ingredients:

(makes 4-6 “burgers”)

  • 1 large sweet potato

  • 1 can of cannellini beans, rinsed and drained

  • 1 cup of cooked quinoa

  • 1 egg, whisked

  • 2 garlic cloves, minced

  • 1 shallot, minced 

  • 1 tsp cumin

  • ½ tsp smoked paprika 

  • ½ tsp chili powder

  • ½ tsp salt

  • ¼ tsp pepper

  • 2 tbsp avocado oil

Directions:

IMG_2522.jpeg
  • Preheat the oven to 425°F. Poke the sweet potato in a few places with a fork and place on a baking sheet. Roast until tender when pierced with a fork, about 45 minutes. Let rest until cool, then peel.

  • In a mixing bowl, mash the sweet potato. Add the cannellini beans and continue mashing to make a rough mixture. Add in the egg, quinoa, garlic, shallot, cumin, chili powder, paprika, salt and pepper and stir to combine. Use your hands to make 4-6 patties.

  • In a large pan over medium heat, warm avocado oil. Add the patties and cook for about 5 minutes per side or until golden brown.

  • Serve burgers on buns or over a salad. I recommend serving with some fresh avocado and dijon mustard!

NOTE: These are veggie burgers and are more delicate than a meat-based burger. Try to be gentle with them and recognize they might fall apart a little.

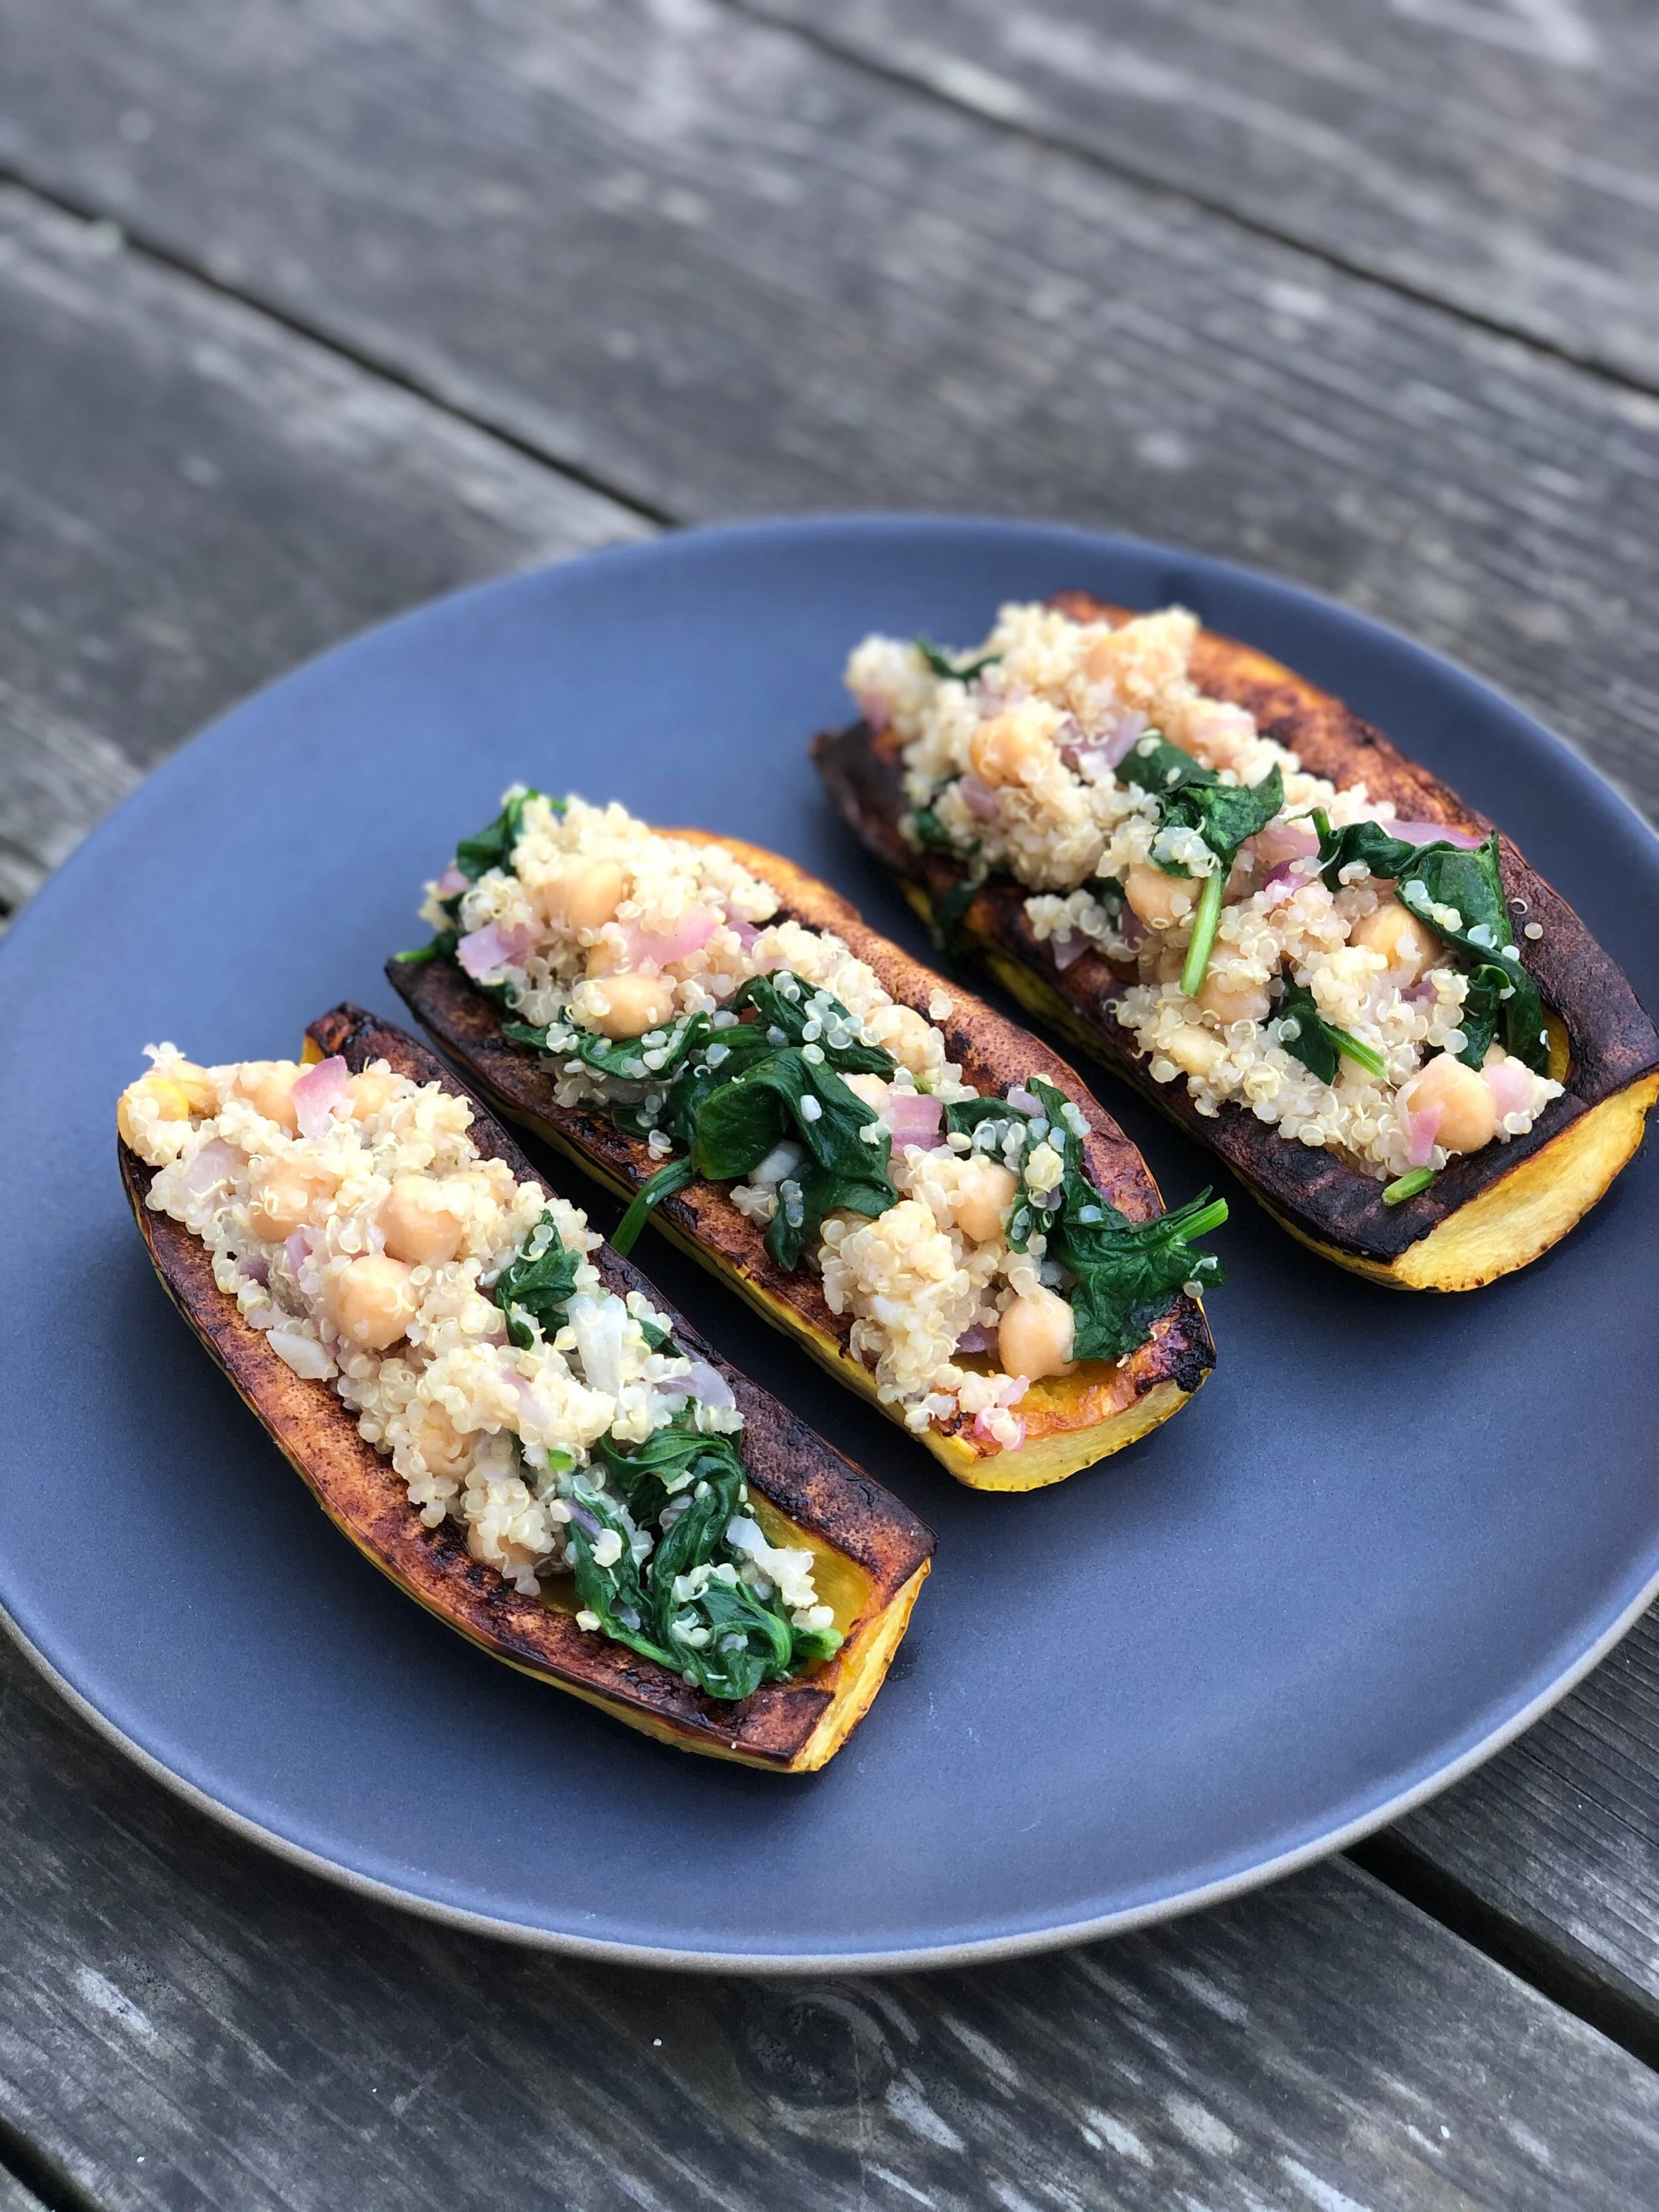
Quinoa Stuffed Delicata Squash

IMG_2388.jpeg

I am obsessed with all types of squash, but delicata is definitely a favorite of mine. I usually roast it in slices and I just love the nutty and sweet flavor that comes out when roasted. In this recipe, I chose to use delicata squash because once the seeds are scooped from the inside, it makes a perfect boat for stuffing with all sorts of goodness, like quinoa!

Right now, we are not grocery shopping quite as often, so it’s helpful to stock up on veggies that really last, like squashes and root vegetables. I made this Quinoa Stuffed Delicata Squash on a night where we really didn’t have too many ingredients lying around, but the end result was so delicious! Feel free to get creative when creating a quinoa stuffing and use whatever ingredients you have on hand - toasted almonds, currants, dried apricots, ground turkey, parmesan, goat cheese, kale, etc… it’ll all taste great! Also, you can stuff a different type of squash too - like acorn or butternut!

Ingredients:

(serves 4 as a side, 2 as a main)

Getting the stuffing ready!

Getting the stuffing ready!

  • 1 cup of uncooked quinoa

  • 2 delicata squash

  • 1 onion (I used a red onion), diced

  • 2 cloves of garlic, minced

  • 1 can of chickpeas, drained and rinsed well

  • 5 ounces of spinach

  • 2 cups of chicken or vegetable broth

  • 2 tbsp avocado oil

  • 1 tbsp olive oil

  • Juice from 1 lemon

  • Salt and pepper to taste

Directions:

  • Preheat the oven to 400 degrees F. Prepare the squash by cutting off the ends, slicing lengthwise and removing the seeds. Coat the squash with avocado oil and sprinkle with salt and pepper. Roast for 35 minutes until golden brown and tender.

  • While squash roasts, cook the quinoa according to the package directions, using broth in place of water.

  • As the quinoa is simmering, saute the onion in a medium sized saucepan over medium heat with olive oil and a pinch of salt. Cook until onions are softened (about 10 minutes). Add the garlic and cook until starting to brown (about 2 minutes). Add the spinach and cook until starting to wilt. Add the chickpeas and continue cooking for 1-2 minutes, or until chickpeas are starting to warm.

  • Combine onion, chickpea, and spinach mixture with the cooked quinoa. Season with salt, pepper, and the juice from a lemon.

  • Once squash are finished roasting, remove them from the oven and spoon in the quinoa mixture and serve!

Veggie Pad Thai

IMG_2343.jpeg

I love Pad Thai so much! It’s an incredibly flavorful and comforting dish, perfect for a lazy night at home. By making your own Pad Thai at home, you know exactly what ingredients are being added to your dish and can be assured it’s not loaded with hydrogenated oils and sugars (typical of take-out). Also, while under “shelter in place,” were not eating out much/at all, so this is the perfect way to satisfy some of our take-out cravings!

FYI - I used Forbidden Rice noodles, which is why they are black in color. Any rice noodle will work for this dish!

Ingredients:

(Serves 2)

Sauce:

  • ¼ cup coconut milk

  • 2 tbsp peanut butter

  • 2 tbsp fish sauce

  • 2 tbsp coconut aminos (or soy sauce)

  • 1 tbsp rice wine vinegar

  • 1 tbsp honey

Noodles:

  • 6 ounces of pad thai rice noodles

  • ½ onion diced

  • 3 cloves of garlic, minced

  • ½ cup frozen peas

  • 1 head of broccoli, cut into florets

  • 2 eggs, beaten

  • 2 tbsp coconut oil

  • Juice from 1 lime

Garnish (optional):

  • ¼ cup of chopped peanuts

  • Lime wedges

  • Bean sprouts


Instructions:

  • Bring a pot of water to a boil and cook rice noodles according to their directions. Rise with cool water and drain. Set aside.

  • In a bowl, whisk together the sauce ingredients and set off to the side.

  • In a large skillet, heat the coconut oil over medium heat. Add the onions (and a pinch of salt) and cook for about 5-8 minutes, or until softened. 

  • Add garlic and broccoli and cook for another 5 minutes, or until soft. (Optional: add a splash of water to help cook and steam the broccoli)

  • Push vegetables to one side of the pan and add the beaten eggs. Scramble eggs until cooked, approximately 2 minutes.

  • Add the peas and sauce mixture, stirring constantly for about 2 minutes, or until it’s bubbling and thickens. Add the lime juice and give it all a good stir.

  • Turn off the heat. Add the cooked noodles into the pan and toss to combine. Serve.

  • Garnish however you’d like!


Optional: Choose whichever veggies you want to use in your pad thai!

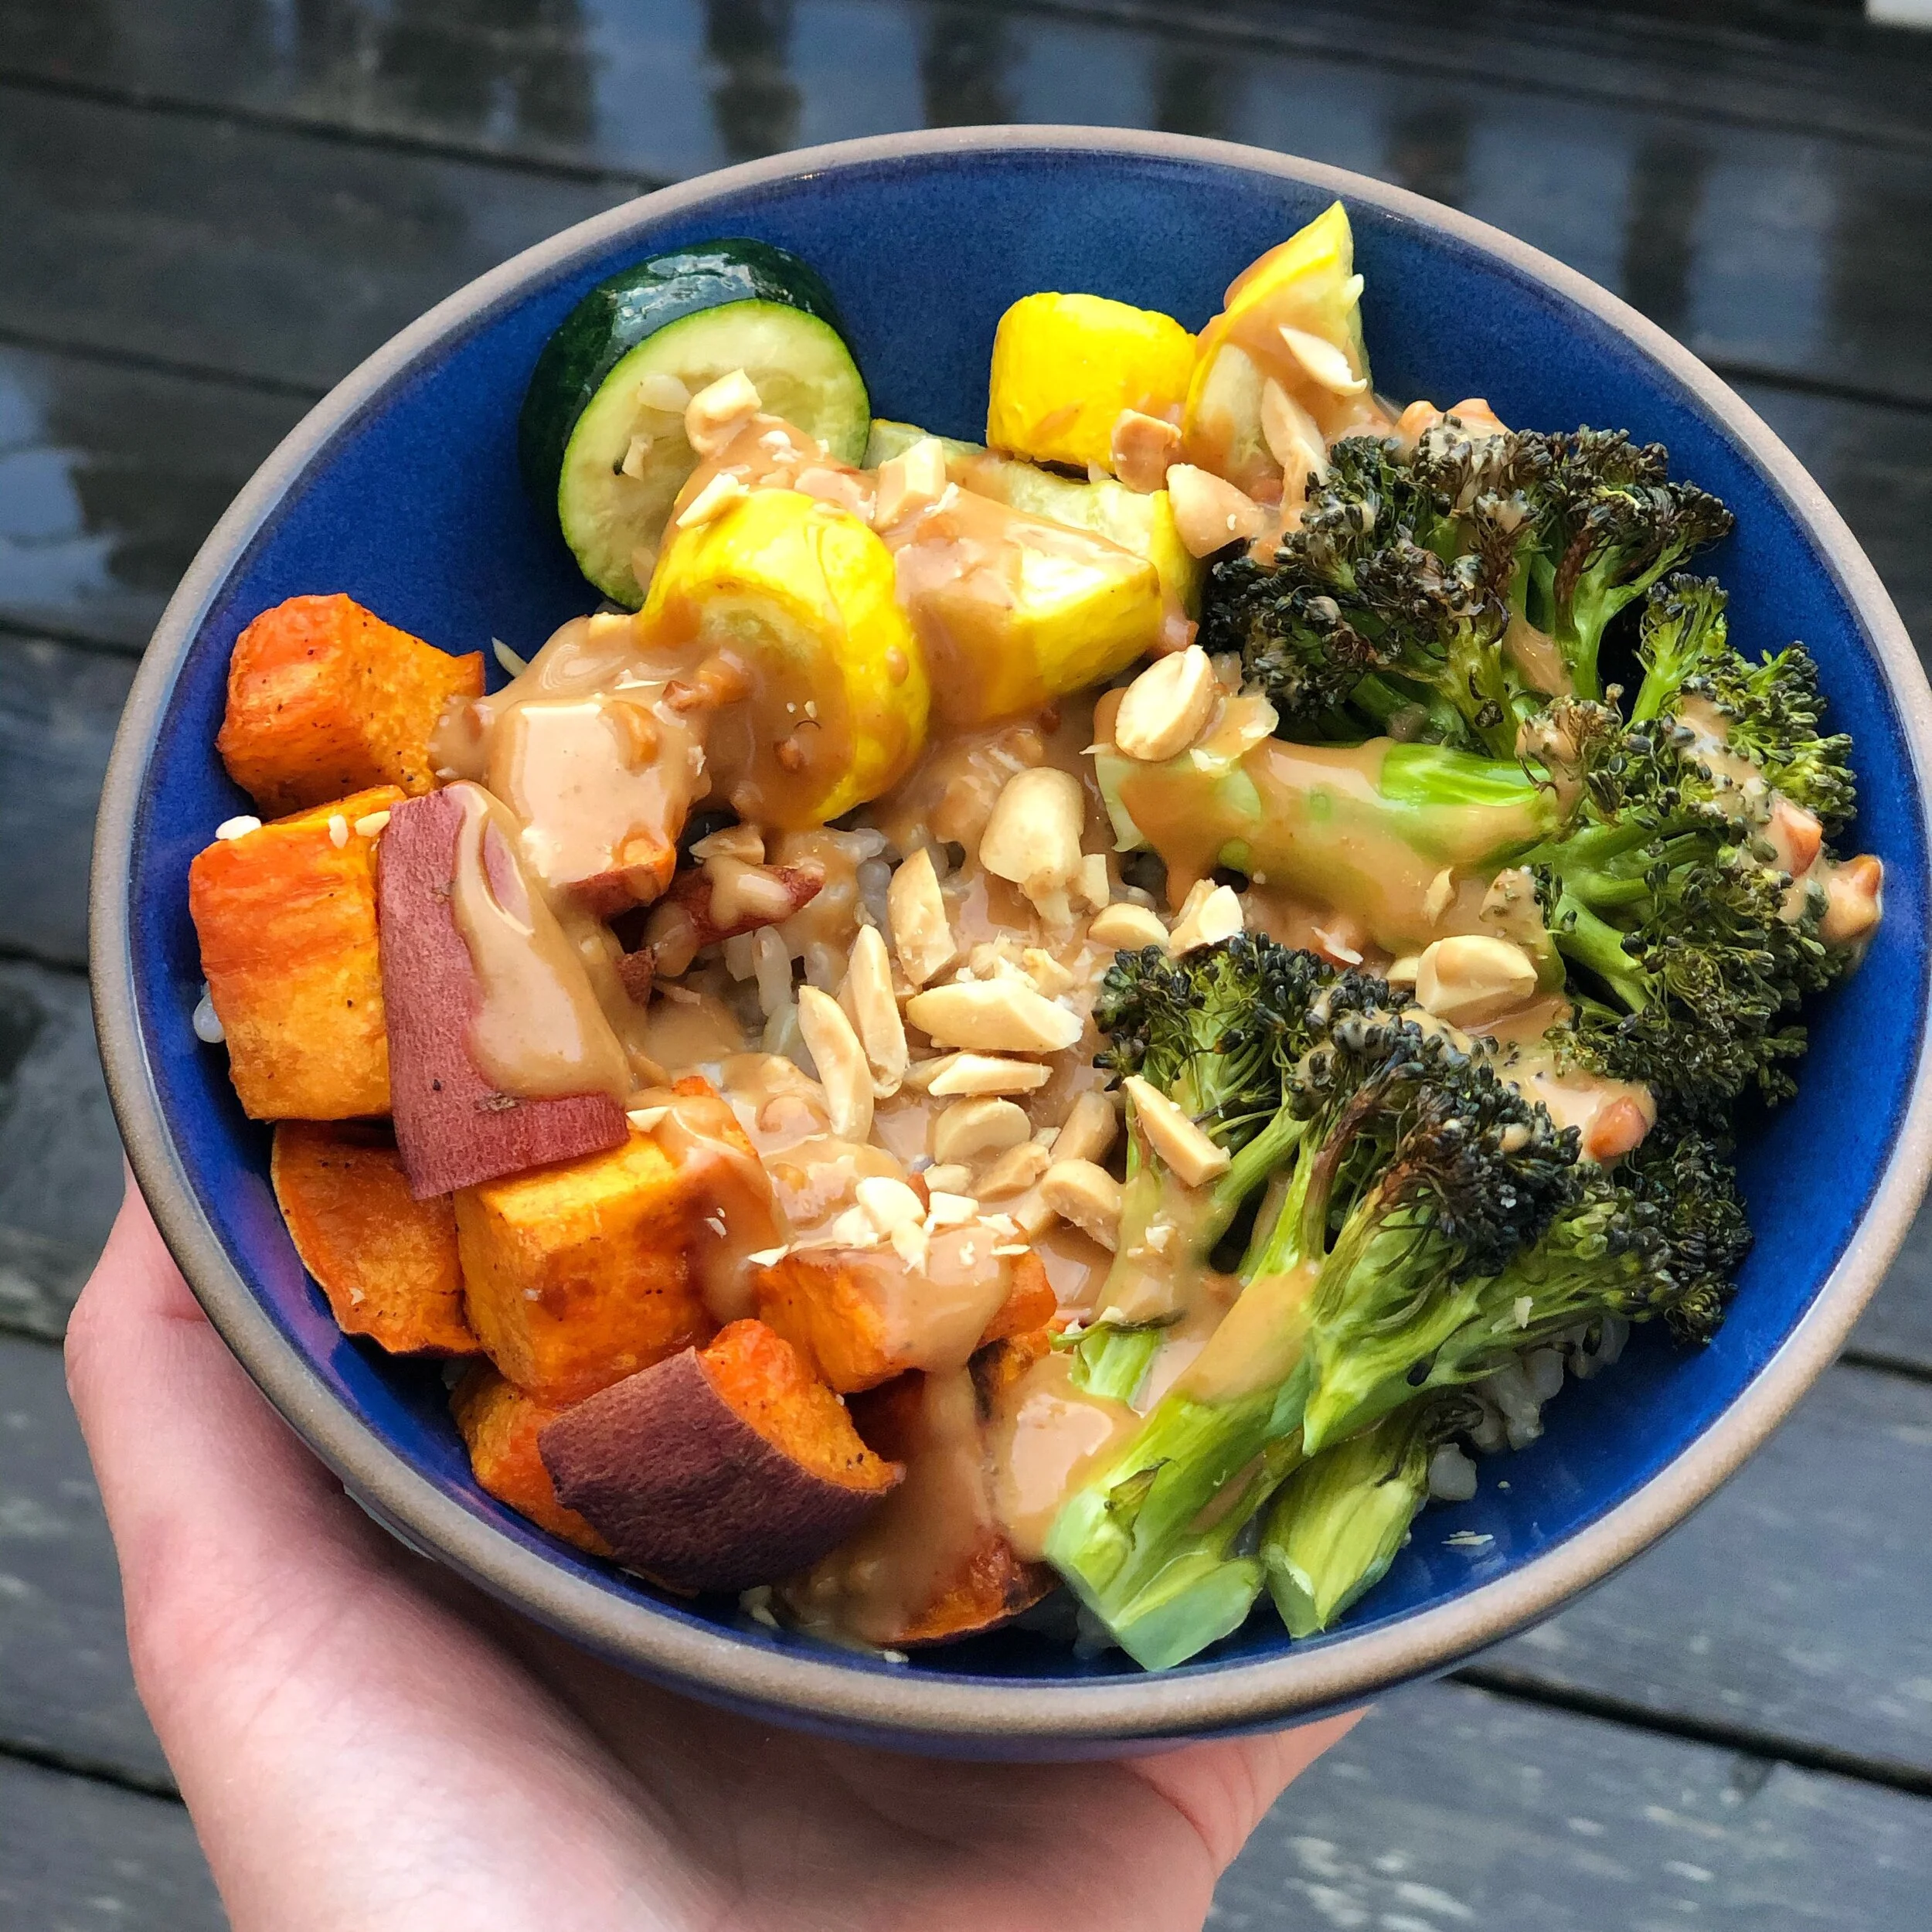
Brown Rice Bowl with Sweet Potatoes, Broccoli, and Peanut Sauce

DA88BD2B-AFBA-4A7B-8E72-4F1E22705D99.jpeg

Peanut butter is an American classic. Who didn’t grow up with PB+J as a household staple?! While peanut butter and jelly is still a favorite of mine, I love using this creamy ingredient when baking or to add some richness to a dish, in the form of a flavorful sauce. Peanuts are given a hard time these days and there are many misconceptions around whether they are healthy or unhealthy for us. Peanuts (and peanut butter) are legumes (in the same family as beans, lentils), not nuts. They can be a healthy addition to our diets, but it’s important to consider quality when shopping for these ingredients. Most peanut butters out there contain added ingredients like hydrogenated oils and sugars, which can cause inflammation and weight gain. If shopping for peanut butter, look for organic peanut butter with only one ingredient: peanuts.

Here is a simple recipe that can be adapted however you like! If you have other fresh veggies on hand, like peppers, spinach, asparagus (whatever it may be), feel free to swap those in instead! You can also just make this sauce and use it as a dipping sauce for chicken, beef, or spring rolls. I personally love how both the brown rice and peanut butter have a nutty flavor profile, but feel free to swap our brown rice for a grain of your choosing (quinoa, Farro, buckwheat)!

Ingredients:

(serves 4)

  • 1 ½ cups of brown rice

  • 2 sweet potatoes, cut into ¾ inch cubes

  • 1 large head of broccoli, cut into florets

  • 4 zucchini, cut into ¾ inch cubes

  • 3 tbsp avocado oil

  • Salt and pepper to taste

Peanut sauce Ingredients:

  • ½ cup creamy or crunchy natural peanut butter

  • 2 tbsp coconut aminos (or soy sauce)

  • 2 tsp honey

  • 2 tbsp fresh squeezed lime juice

  • 2 cloves of garlic, pressed

  • 3 tbsp warm water


Directions:

  • Prepare brown rice according to package instructions.

  • Preheat oven to 400 degrees F. Toss sweet potatoes with half of the avocado oil, salt and pepper. Roast on a baking sheet for about 45 minutes, flipping about halfway.

  • With 20 minutes left of roasting for the sweet potatoes, toss broccoli and zucchini with the remaining avocado oil, salt and pepper. Roast for 20 minutes.

  • While veggies roast, prepare the peanut sauce. Add more water and lime juice if necessary to reach a smooth consistency.

  • Once veggies are cooked, create brown rice bowls topped with vegetables and peanut butter sauce! 

Health Benefits of Peanut Butter:

  • Peanuts/peanut butter are a high-protein food, making them a great option for a post-workout snack (to build and repair muscles) or for a midday snack that fills you up between meals

  • Half the fat in peanut butter is comprised of oleic acid, which is a health monounsaturated fat (also found in olive oil). It also contains linoleic acid, an essential omega-6 fatty acid. It’s important to keep in mind the importance of balancing our omega-6 intake with omega-3 foods.

  • Peanut butter is high in antioxidants, which can help our bodies fight oxidative stress.

  • The high amounts of unsaturated fats, vitamin E, and B vitamins found in peanut butter are beneficial to improving brain health!


Sources and additional reading:

Avocado Stuffed with Crab Salad

IMG_2167.jpeg

We are lucky to have amazingly fresh Dungeness Crab in San Francisco, and it is something I try to take full advantage of! Fresh crab meat is delicate and sweet, and just so satisfying! We got some fresh crab meat this week and decided to throw together an incredibly simple dinner in about five minutes. It’s perfect for a weeknight meal when you want something healthy, yet you don’t have time to do a lot of prep!

Ingredients:

(serves 2)

  • ½ lb of fresh crabmeat

  • ¼ cup plain greek yogurt

  • 1 ripe avocado, halved and pitted

  • Juice from 1 lemon

  • Salt and pepper to taste

  • Optional - fresh parsley for garnish

Directions:

  • In a small bowl, mix together crabmeat, greek yogurt, lemon juice, salt and pepper. Taste and adjust seasonings if needed.

  • Fill the avocado halves with crab salad and garnish with parsley (optional)

* Serving suggestion: You will have leftover crab salad. I recommend making a simple salad with mixed greens, olive oil, lemon juice and sea salt and topping that with another scoop of the crab salad. 


Health Benefits of Crab:

  • Crab meat is high in phosphorus, which is essential for bone and teeth development.

  • It’s an excellent source of Omega-3s, an essential fatty acid, which is anti-inflammatory and can balance cholesterol levels.

  • Crab meat is an excellent source of copper, a mineral that helps with iron absorption and boosts blood circulation throughout our bodies.

  • It’s an excellent source of vitamin B12, which our bodies need in order to produce healthy red blood cells. 

  • It’s low in calories, yet it’s still an excellent source of protein and healthy fats (omega 3s).

Sources and Additional Reading:

Brown Rice Mushroom Leek Risotto

IMG_2172.jpeg

I love a delicious, creamy, satisfying risotto as much as the next person, however, I find that I rarely actually order this dish at a restaurant because they are always loaded with butter, cheese, and cream. Classic risottos can be so incredibly rich, and when I order it I often end the meal feeling sick. That is why I created a healthier version of one of my favorite dishes - a risotto made with leeks, mushrooms, and a whole grain brown rice. It’s still rich and creamy, but it will leave you feeling nourished rather than ill after enjoying. Hope you love it as much as I do!

Ingredients:

(serves 2, generously)

  • 1 cup brown rice

  • 2 cups mushrooms (I use shitake), cleaned and sliced

  • 4 leeks, white and light green parts only, washed, trimmed, and thinly sliced

  • 3 cloves of garlic, minced

  • 2 tbsp olive oil

  • 1 tbsp butter or ghee

  • ½ tsp salt

  • ½ tsp pepper

  • ½ cup white white (dry)

  • 4 cups chicken or vegetable broth

  • ¼ cup finely grated parmesan cheese


Directions:

  • Add broth to a small saucepan and keep warm over low heat

  • Heat 1 tbsp. butter and 1 tbsp. olive oil in a large saucepan or Dutch oven over medium high heat. Add mushrooms and cook until they are lightly browned and tender stirring frequently. Sprinkle with salt, give a good stir and then remove the mushrooms from heat and set aside.

  • Reduce the heat to medium, add the remaining tbsp of olive oil, leeks, garlic, salt and pepper and cook until tender (about 5 minutes)

  • Add rice and stir to toast rice a bit (about 2-3 minutes). Add wine and deglaze the bottom of the pan

  • Turn the heat to medium low and stir until wine is absorbed. Add broth, a ladle-full at a time, stirring until liquid is just absorbed each time. Keep adding liquid and stirring until rice is fully cooked. If you need more liquid, add additional broth or water. It will take about 45 minutes to an hour for the rice to cook through.

  • Once rice is fully cooked, stir in grated cheese and mushrooms and serve!

  • Optional: garnish with fresh parsley

Health Benefits of Brown Rice:

  • Brown rice is an unrefined, whole grain (unlike white rice) and therefore still has its bran and side hulls, which are rich in vitamins and minerals, as well as an excellent source of fiber.

  • One cup of brown rice provides us with more than 80% of the daily value of manganese, which benefits our nervous and reproductive systems and helps us synthesize fats.

  • The high fiber content in brown rice is important for healthy digestion and for keeping blood sugar levels stable

  • One cup of cooked brown rice has more than 25% of our daily value of selenium, a trace mineral that many of us do not get enough of - selenium is essential to thyroid hormone metabolism and for immune support. Another great source of selenium is brazil nuts!

Sources and additional reading:

Broccoli Leek Pasta

IMG_2006.jpeg

This pasta dish is seriously SO good! I went back for seconds and thirds and ate to the point where my stomach felt like it might explode. I love cooking with leeks because they have a sweeter, more delicate, and I think more sophisticated flavor than onions. In this recipe, I’ve also included anchovies, which brings out a delicious umami flavor (plus they are loaded with omega 3 fatty acids). Finally, the brown rice pasta adds a nuttiness to the overall dish and went perfectly (in my opinion) with the sauce. This pasta is a one dish dinner, perfect for a busy weeknight! Hope you enjoy it as much as I do!


Ingredients:

(serves 2, generously)

  • 1 large head of broccoli, cut into florets

  • 8 ounces of pasta of your choice (I use brown rice pasta)

  • ¾ cup vegetable broth

  • 2 tbsp olive oil

  • 4 leeks, white and light green parts only, washed, trimmed, and thinly sliced

  • 4 cloves of garlic, minced

  • 2 mashed anchovies (omit if vegetarian)

  • Juice from ½ a lemon

  • Salt and pepper to taste

  • Pinch of red chili flakes

  • For serving: grated parmesan cheese

Directions:

  • Steam the broccoli florets until easy pierced with a fork (about 5 minutes) and then set aside.

  • Cook your pasta according to the package instructions. Be sure to save about ½ cup of pasta water once pasta is cooked.

  • In a large pan, over medium heat, sautee the leeks in the olive oil until softened (about 5-6 minutes). Add in garlic and red chili flakes and cook (stirring frequently) until fragrant (about 2-3 minutes).

  • Add in anchovies and give it all a good stir, and then add the broccoli, broth, salt, and pepper. Bring to a simmer and stir every so often for about 10 minutes or until liquid is reduced, working to mash the broccoli with your wooden spoon

  • If needed, add pasta water to the broccoli leek sauce one tablespoon at a time until your sauce reaches a consistency of your liking 

  • Turn off the heat, taste sauce and adjust seasonings if needed. Squeeze juice from half a lemon, stir to combine, and then add your cooked pasta to the sautee pan to combine. Serve with some grated parmesan.

  • Optional: Feel free to blend your sauce if you prefer a smoother consistency.

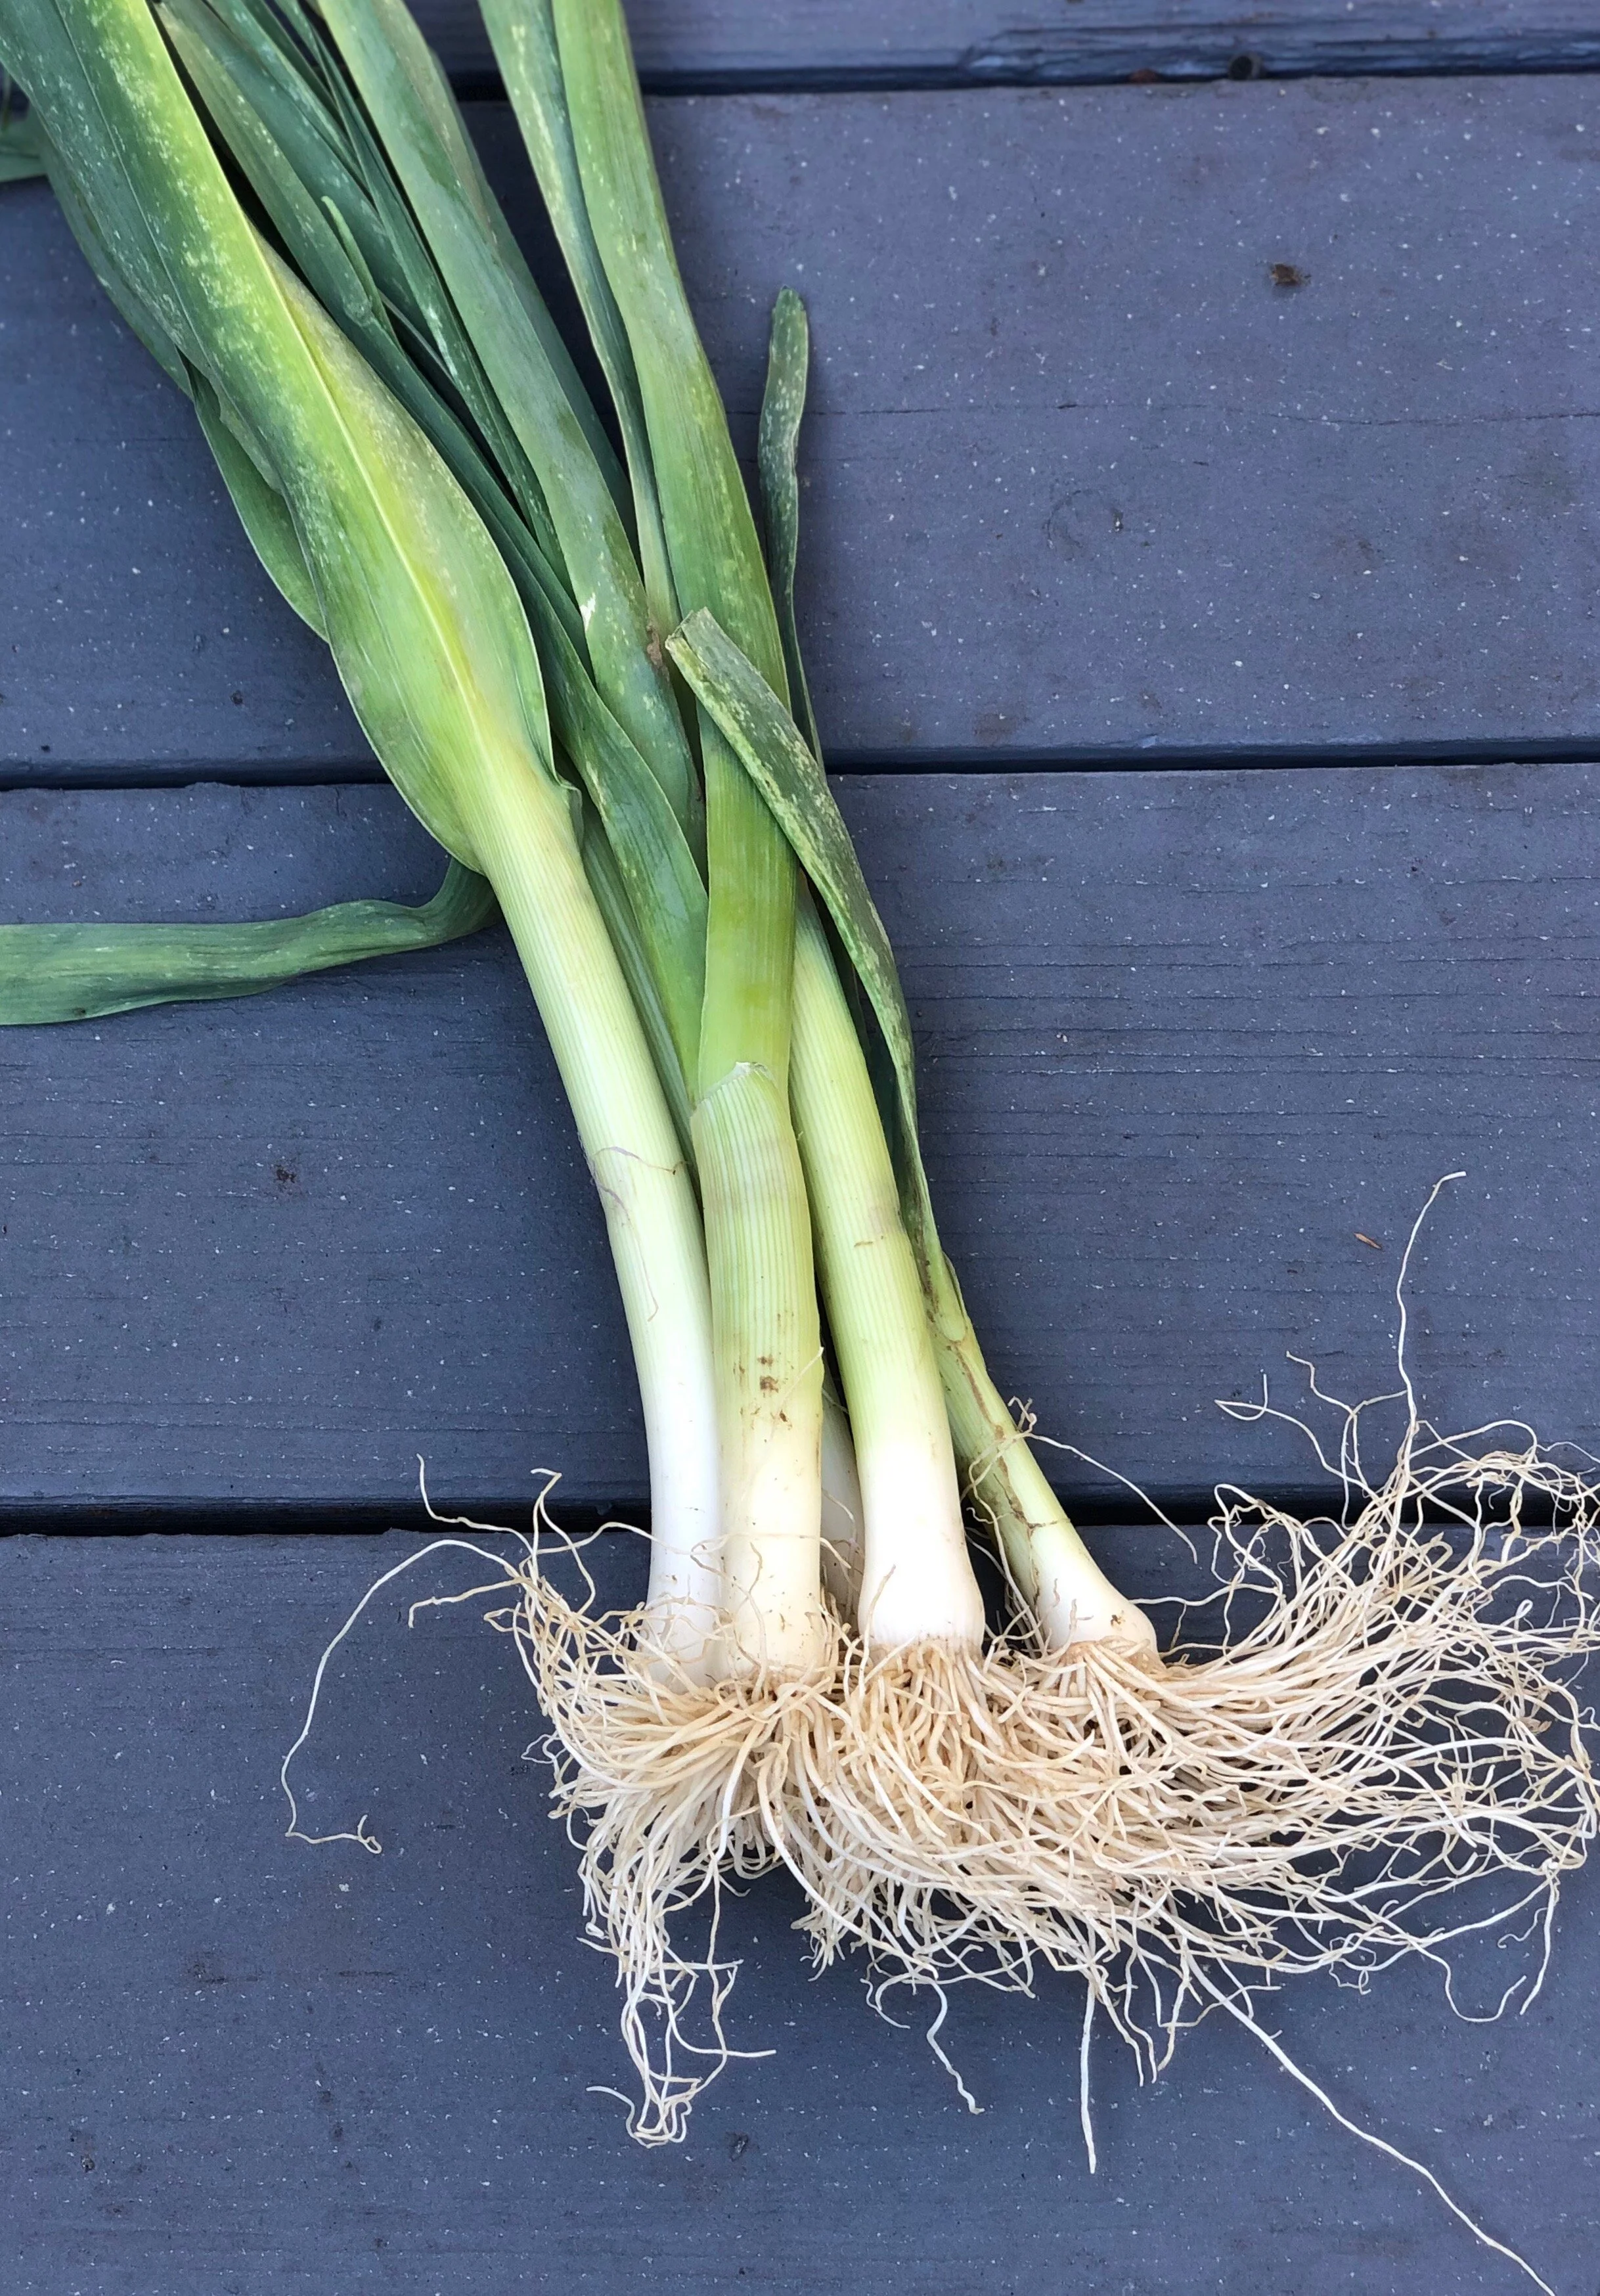
Health Benefits of Leeks:

IMG_1985.jpeg
  • Leeks are an excellent source of vitamin A, which supports healthy development of red and white blood cells and also vision health.

  • They are high in prebiotics, which feeds beneficial bacteria in our gut and improves nutrient absorption.

  • Leeks provide our bodies with vitamin K, which regulates blood flow and is essential for bone health.

  • They also supply us with folate, which supports a healthy pregnancy.

Sources and additional reading:

Veggie Sweet Potato Chili

IMG_1707.jpg

This is a perfect “Meatless Monday” dinner! It’s hearty, filling, and so satisfying! I love topping my chili with some avocado and greek yogurt for some creaminess and richness. This recipe is also ideal for group dinners because it’s quick, easy, and uses just one pot!

Ingredients:

(Serves 4)

  • 1 tablespoon olive oil

  • 1 medium yellow onion, chopped

  • 1 red bell pepper, chopped

  • 1 medium sweet potato, peeled and cut into 1⁄2-inch cubes

  • 3 garlic cloves, pressed or minced

  • 1 tablespoon chili powder

  • 1 teaspoon ground cumin

  • ½ teaspoon cayenne pepper 

  • 1 large can (28 ounces) diced tomatoes, with their juices

  • 2 cans (15 ounces) black, kidney, or cannellini beans (or a combo) rinsed and drained

  • 2 cups vegetable broth

  • Salt and freshly ground black pepper to taste

  • Garnish with: sour cream or greek yogurt, grated cheese, jalapeno, cilantro, and avocado

IMG_1697.jpg

Directions:

  1. Heat a Dutch oven over medium heat. Add olive oil, onions, peppers, and sweet potatoes and a sprinkle of salt and pepper. Cook, stirring occasionally, until the onions start turning translucent, about 5-8 minutes.

  2. Add the garlic, chili powder, cumin, cayenne, stirring frequently for 2-3 minutes. Then add tomatoes, beans and broth, and stir. Bring the chili to a simmer. Let simmer, stirring occasionally until the sweet potatoes are tender and the chili has thickened (about 45 minutes)

  3. Serve the chili with garnishes and enjoy!

Health Benefits of Cumin:

  • Cumin is a good source of iron, which improves blood flow and circulation.

  • Cumin is one of the most gut-friendly herbs, stimulating enzymes that aid in the digestion process.

  • Cumin has antiviral and antibacterial properties, which helps to prevent the flu or common cold.

  • It can help with respiratory issues because it’s an anti-congestive agent and can aid in the clearance of mucus from the airways and lungs.

Sources and Additional Reading

  • https://www.organicfacts.net/health-benefits/seed-and-nut/health-benefits-of-cumin.html

  • https://www.netmeds.com/health-library/post/8-impressive-health-benefits-of-cumin

  • https://draxe.com/nutrition/cumin-seeds/

Roasted Carrot Ginger Soup

1.jpeg

This soup requires so few ingredients, yet it packs a ton of flavor! By roasting the carrots, they carmelize and add even more depth and complexity to this soup. Adding a little coconut milk adds richness and creaminess. I highly recommend doubling this and storing leftovers in the fridge or freezer for a quick weeknight meal!

Ingredients:

(serves 2)

  • 8 medium/large carrots, halved and quartered

  • 3 cups vegetable broth

  • 1 tbsp coconut oil

  • 1 tbsp avocado oil 

  • 1 yellow onion, chopped

  • 3 garlic cloves, minced

  • 1 tbsp chopped fresh ginger

  • ¾ cup coconut milk

  • Salt and pepper to taste

Directions

  • Preheat oven to 400 degrees

  • Toss carrots with avocado oil and a couple pinches of salt and pepper. Roast in the oven for 25 minutes, or until caramelized and tender.

  • Once carrots are almost finished in the oven, melt the coconut oil in a large sauce pan or dutch oven over medium heat.

  • Add onion, a pinch of salt and cook for about 8 minutes (stirring occasionally) or until onions are soft and translucent.

  • Add garlic and ginger and cook for another 2-3 minutes, stirring frequently

  • Add the roasted carrots and vegetable broth. Bring to a boil and then reduce heat to a simmer for about 5 minutes. Add in coconut milk and stir.

  • Blend in a blender or use an immersion blender until smooth. Taste and add salt if needed.

  • Optional - garnish with pumpkin seeds

Spaghetti Squash in a Cashew Cream Sauce

Served with sautéed shiitake mushrooms and thyme, with a side of broccolini

Served with sautéed shiitake mushrooms and thyme, with a side of broccolini

I clearly remember the first time I tried a spaghetti squash. My older sister and I stopped at a farm stand outside NYC one weekend years ago and were intrigued by this huge, yellow, oval shaped squash. We roasted it in the oven and topped it with pesto and chicken sausage, and we were obsessed! It quickly became a household favorite (we were living together at the time) and it continues to be a go-to for me when I’m craving a warm bowl healthy “pasta.” It’s the perfect thing to cook on a weeknight because you can keep it simple and just top with your favorite sauce. Or you can try this vegan cashew “alfredo” sauce that tastes incredibly decadent, but is made entirely of good-for-you ingredients. I honestly can’t get enough of this dish right now. It’s quick, simple, and flavorful!

We typically make this for dinner and heat up leftovers the next day for lunch. One spaghetti squash produces a surprisingly large amount of “spaghetti”!

Be very careful when cutting your spaghetti squash - use a sharp knife!

Be very careful when cutting your spaghetti squash - use a sharp knife!

Ingredients

(serves 2-4)

For the squash

  • 1 medium/large spaghetti squash

  • 1 tbsp avocado oil (or olive oil)

  • Salt and pepper to taste

For the sauce:

  • 1 cup of raw cashews, soaked for at least 4 hours in filtered water

  • 1 yellow onion, diced

  • 3 cloves of garlic, finely chopped

  • 1 tbsp coconut oil

  • 2 tbsp lemon juice

  • ½ tsp salt

  • ¼ tsp pepper

  • ¾ cup hot, filtered water

Directions:

Roasting complete!

Roasting complete!

  • Preheat the oven to 400 degrees F

  • Slice the spaghetti squash in half lengthwise and scoop out the seeds. Drizzle the inside of the squash with avocado or olive oil and sprinkle with salt and pepper.

  • Place the spaghetti squash cut side down on the baking sheet and roast for about 45 minutes or until lightly browned on the outside and skin is soft

  • Remove from oven and let cool for 10 minutes. Once cool, scrape out spaghetti strands with a fork and place in a large serving bowl.

  • While squash cooks, heat a medium skillet over medium heat. Add coconut oil, onion, and a pinch of salt. Stir for 5-10 minutes until onion is softened. Add garlic and cook for 2-3 minutes, or until fragrant and starting to brown. 

  • Rinse and drain the soaked cashews. Add to a blender, along with the onion mixture, lemon juice, salt, pepper, and the hot water. Blend until silky smooth.

  • Add sauce to the bowl of cooked spaghetti squash and toss until combined. Serve in a bowl or in your spaghetti squash shells. 

Optional: 

  • Sauté sliced shitake mushrooms and/or spinach to add into your sauce for an extra hearty and veggie-focused dish!

  • Try adding 1-2 tbsp of nutritional yeast to make it “cheesier.”

  • Try adding 2 tsp of mirin, a Japanese sweet rice wine, in place of lemon juice for a slightly sweeter version (my current favorite way to prepare this).

Health Benefits of Spaghetti Squash:

  • Spaghetti squash is low in calories and loaded with nutrients

  • It is high in soluble fiber, which helps keep you full and promote healthy digestion (and regular bowel movements)

  • It’s a great source of antioxidants, like beta carotene and vitamin C, which can help prevent inflammation and chronic disease

  • Spaghetti squash contains vitamin A, which helps keep our skin and eyes in good health

Additional Reading and Sources:

Quinoa and Apple Stuffed Acorn Squash

IMG_9397.jpeg

I love cooking with acorn squash. Not only do they taste great, but they are so versatile and easy to work with. You can simply chop them into chunks and roast them in the oven with salt and pepper, but my favorite way to prepare them is by stuffing them with a flavorful combination of whole grains and veggies. I probably make some version of stuffed squash (I love trying heirloom varieties, like Thelma Sanders squash and Carnival squash, that I find at local farmers markets too) every other week in the fall. It’s such a warming and comforting dish that feels sophisticated, yet is not labor intensive. Stuffed acorn squash can be a hearty vegetarian main course, or you can easily add some ground turkey or chicken sausage if you feel like you need a little meat.

Ingredients:

A chicken sausage brand I recommend

A chicken sausage brand I recommend

  • 2 acorn squash

  • ½ cup quinoa, dry

  • 4 chicken sausages, chopped into ¼ inch pieces (omit for vegetarians)

  • 1 shallot, chopped finely

  • 2 cloves of garlic, minced

  • 1 tbsp avocado oil

  • 1 tbsp olive oil

  • 1 tbsp fresh thyme, chopped

  • 1 tbsp fresh rosemary, chopped

  • 2 apples, diced

  • 1 cup vegetable broth

  • Salt and pepper to taste

Directions:

Preparing the squash

Preparing the squash

  • Preheat oven to 425 degrees F

  • Prepare the acorn squash by trimming the ends to make them flat. Then cut them in half horizontally and scoop out the seeds. Drizzle with avocado oil and sprinkle with salt. Place them on a baking sheet with the cut sides facing down. Bake until they are easily pierced with a fork, about 35-40 minutes. 

  • Meanwhile, cook the quinoa. Rinse the quinoa and then place it in a small pot with 1 cup of vegetable broth. Bring to a boil, and then simmer (covered) until all the broth has been absorbed, about 12-15 minutes. Remove the pot from the heat, and fluff the quinoa with a fork. 

  • In a medium/large skillet, cook the chicken sausages over medium heat until starting to brown, about 5-7 minutes. Remove them from the skillet and set aside.

  • Add olive oil to the skillet along with shallots and a sprinkling of salt. Cook, stirring every so often, until shallot begins to soften, about 5 minutes. Add in garlic, sage, and rosemary and cook for about a minute, or until fragrant. Add in apple pieces and cook until starting to soften, about 3-5 minutes. Add a splash of vegetable broth to help the apples soften. 

  • In a mixing bowl, add the skillet ingredients, cooked quinoa, and chicken sausages. Stir to combine. Taste and add additional olive oil, salt, and pepper to taste. I personally like to add a small amount of additional chopped rosemary and thyme.

  • Remove the cooked squash halves from the oven and stuff them with the quinoa mixture, and serve.

Tip: You can easily tweak this recipe and make it your own! For example, add in mushrooms and/or top with toasted pumpkin seeds and goat cheese.

Another tip! Make double the amount of stuffing and enjoy as a quinoa bowl for lunch the next day with some sautéed greens.


Health Benefits of Acorn Squash:

  • Acorn squash is an excellent source of vitamin C, which boosts immune function and helps to reduce inflammation

  • They are rich in potassium, which helps maintain balanced blood pressure levels and regulates fluid balance in cells and tissues

  • They are a high-fiber food, which supports regularity, healthy digestion, and the absorption of nutrients from food.

  • Acorn squash is a great source of beta-carotene, which converts to vitamin A in our body, and helps eliminate free radicals and improve eye health

Sources and Additional Reading:

Pork Chops over Roasted Apples, Sweet Potatoes, and Brussel Sprouts

IMG_8940.jpeg

I made this the other night as the wind was picking up and the temperature was dropping. It is the perfect fall dinner recipe as it features so many delicious seasonal ingredients. It’s comforting, hearty, and incredibly flavorful. Apple sauce is frequently paired with pork chops, and in this recipe, the sweetness from the roasted apples balance out the savory flavors from the meat and other vegetables. You can swap the veggies around, like substitute butternut squash for sweet potatoes and add in some red onion wedges. Enjoy!

Make sure to generously salt the pork chops while bringing them to room temperature

Make sure to generously salt the pork chops while bringing them to room temperature

Ingredients

(serves 2) 

For the Pork:

  • 2 bone in pork chops

  • 2 tablespoons avocado oil

  • Salt and fresh ground black pepper

  • 3 cloves of garlic, minced

  • 1 rosemary sprig

  • ½ cup chicken or vegetable broth

For the Roast Veggies:

The seared pork chops

The seared pork chops

  • 1 large sweet potato, cut into ¾ in. cubes

  • 1 ½ cups of Brussel sprouts, quartered

  • 2 medium sized apples, cut into ¾ in. cubes

  • 1 tbsp fresh thyme, chopped

  • 1 tbsp fresh rosemary, chopped

  • 2 tbsp avocado oil

  • Salt and pepper to taste

Directions:

  • Preheat oven to 400 degrees

  • Pat pork dry with paper towels and then season generously with salt. Let come to room temperature. Just before cooking, pat dry with a paper towel.

  • In a large mixing bowl, combine sweet potatoes, Brussel sprouts, apples, rosemary, thyme, avocado oil, salt and pepper. Spread veggies on a large baking sheet and roast for about 50 minutes or until browned and crisp. 

  • While veggies roast, heat the avocado oil in a large cast-iron skillet over medium high heat. Once very hot, add the pork and sear on both sides (about 2-3 minutes a side). 

  • Transfer pork to the oven and roast for 7-10 minutes or until an internal thermometer reads between 145 and 150 degrees F.

  • Remove pork from skillet and let rest for about 10 minutes

  • Place the skillet (with pork juices) over medium heat, add broth, garlic and rosemary sprig until reduced by half, about 5 minutes.

  • Slice the pork, and serve over roasted vegetables. Spoon sauce on top. 

Before roasting….

Before roasting….

After roasting…

After roasting…

Simple Green Curry

Served over brown rice with shrimp

Served over brown rice with shrimp

I LOVE curries and used to order Thai takeout once a week to satisfy this obsession. I eventually tried making my own and realized how easy it was and how much better I felt afterwards. Take out Thai food is typically made with highly refined oils that can lead to inflammation and bloating. When making curries or other Thai food at home, you can control what goes into your dish and know exactly what you’re eating. I’ll often make veggie-heavy curries when I’m not in the mood for meat because I find them deeply satisfying and filling, especially when served over brown rice. Hope you enjoy!

Ingredients:

(Serves 2-4)

  • 1 eggplant, sliced into 3/4 inch pieces

  • 4 zucchini, cut into 1 inch slices

  • 1 cup of mushrooms, cleaned and roughly chopped

  • 2 cups of spinach leaves

  • 1 medium yellow onion, chopped

  • 1 tbsp coconut oil

  • 1-inch piece of ginger, peeled and chopped

  • 2 garlic cloves, minced

  • 1 lemongrass stalk, outer layers removed and cut into 4 pieces

  • 3-4 tablespoons Thai Green Curry Paste (I use Thai Kitchen because it’s easy to find or this one when I can find it because it has a lot more heat)

  • 1 14 ounce can of full fat coconut milk

  • 1 cup water

  • Juice from 1 lime

  • Salt and pepper to taste

Directions:

Here it is with cauliflower in place of zucchini.

Here it is with cauliflower in place of zucchini.

  • Warm a pot over medium heat. Add coconut oil, onions, and a pinch of salt. Cook and soften for about 10 minutes, stirring occasionally

  • Add ginger and garlic and cook for two minutes, stirring frequently

  • Add curry paste and stir for about 1 minute

  • Pour in the coconut milk and water. Add the lemon grass. Stir.

  • Add all vegetables except for spinach and bring the the mixture to a simmer. Cover with a lid and cook for about 15-20 minutes or until vegetables are cooked through. Add spinach and stir until wilted. Add lime juice.

  • Taste and adjust seasonings: add salt, red pepper flakes or more lime juice if needed

  • Serve

Serving suggestions: Serve over brown rice and garnish with basil and lime wedges

Additional Notes: You can substitute other veggies too, like cauliflower, sweet potato, and chickpeas. You can also throw in some shrimp or other protein. Shrimp only takes about 4 minutes to cook through so add it at the end!

Grilled Peach and Steak Arugula Salad

This salad will always remind my of summer nights with my family. Every summer for the last 10 years (at least), my large family sits down to a version of this meal with great delight. The peppery arugula with the charred steak and sweet peaches is a combination that can’t be beat. I also like to add some pistachios for a nutty crunch, feta (or goat cheese), and pickled red onions. This recipe is incredibly quick to whip up, which makes it the perfect post-beach day dinner. Serve it with a fresh baguette or with a side of corn or the cob.

IMG_6115.jpeg

Ingredients (serves 4)

For the steak:

  • 1 1/2 lb flank steak or skirt steak

  • 1 ½ teaspoon kosher salt

  • 1 tsp ground pepper

  • 1/4 cup balsamic vinegar

  • 2 tbsp olive oil

  • 2 garlic cloves, minced

  • 2 tablespoon fresh rosemary, roughly chopped


For the salad:

  • 2 peaches (make sure they’re not overly ripe), pit removed and halved

  • 2 large handfuls or arugula

  • 1 tsp avocado oil

  • ¼ cup fresh mint leaves, roughly chopped or torn

  • ¼ cup of pistachios

  • ¼ cup of fresh feta cheese, crumbled

  • Pickled onions

For the dressing:

IMG_6112.jpeg
  • 1 small shallot, minced

  • 6 tbsp olive oil

  • 3 tbsp red wine vinegar

  • Zest and juice from 1 lemon

  • Salt and pepper to taste


Directions:

  • Make salad dressing by combining all dressing ingredients in a small bowl or mason jar. Whisk or shake so that ingredients are mixed together.

  • Prepare the steak by combine vinegar, olive oil, garlic, and rosemary in a shallow dish or plastic bag.

  • Poke holes (using a fork) in the steak, then season with salt and pepper. Turn steak over and repeat.

  • Add seasoned steak to the marinade and let sit for at least 2 hours (can even be marinated overnight). Make sure to bring steak to room temperature before you’re ready to grill

  • Heat the grill to high heat. Once hot, grill the steak for about 4 minutes per side (for medium rare). Let it rest a few minutes before slicing.

  • While steak is resting, brush peach halves with avocado oil and place on grill for about 3-4 minutes, or until you see grill marks and the peaches begin to soften. Set aside and let cool. Then slice into 1 inch wedges.

  • Assemble arugula, pistachos, feta, pickled onion, and mint leaves in a large salad bowl. Top with sliced peaches and steak. Add dressing. Toss and serve.