gluten-free

Almond Flour Pumpkin Bread

IMG_9145.jpeg

This recipe kicks off the week of PUMPKIN! Since I am literally obsessed with pumpkin (I know, basic, but it's true), I decided to share a new pumpkin recipe each day this week. I used to dream about opening up a cafe called “La Zucca” (Italian for “pumpkin”), where most, if not all, of my dishes would feature pumpkin as the main ingredient. Before I was more health-conscious, these dishes included pumpkin bread french toast, pumpkin ravioli, pumpkin cheesecake, pumpkin muffins with cream cheese, and the list goes on. This week, you’ll be seeing recipes that are more in line with my new way of thinking, which is that we should be thinking about food as medicine - that we should be eating nutrient-dense food that nourishes and fuels us. These nourishing foods can still be incredibly delicious, as I believe these recipes to be! Maybe I still will open a pumpkin cafe one day...I’ll keep you posted if I do :) 

IMG_9138.jpeg

Now, for the pumpkin bread. Anyone who knows me well knows about my obsession with pumpkin bread. I would easily take down an entire loaf on my own if I didn’t practice just a bit of self-restraint. I used to buy the boxed pumpkin bread mix from Trader Joe’s, but there are a ton of processed and refined ingredients, plus lots of sugar! When you make a homemade loaf with simple ingredients, I realized, it actually tastes much better and doesn’t leave you feeling guilty or gross after. Make a loaf of this and enjoy it as a snack, as your breakfast (maybe topped with almond butter and bananas to get some extra protein), or for a guilt-free dessert. It’s grain-free, dairy-free and free of refined sugars. 
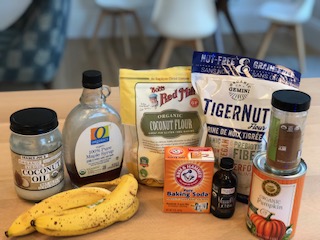
Ingredients:

  • 2 cups almond flour

  • 1 15 ounce can pumpkin puree

  • ¼ cup maple syrup

  • 3 tbsp coconut oil, melted

  • 3 eggs

  • 1 tbsp + 1 tsp pumpkin pie spice

  • 1 tsp cinnamon

  • ¼ tsp salt

  • 1 tsp vanilla extract

  • 1 tsp baking soda

Directions:

  • Preheat oven to 350°F. Line a loaf pan with parchment paper or grease with coconut oil.

  • In a medium bowl, gently whisk eggs. Then add pumpkin puree, maple syrup, coconut oil, and vanilla and stir until combined.

  • In another bowl, add almond flour, salt, pumpkin pie spice, cinnamon, baking soda, and baking powder and stir together. Then add to wet ingredients and mix until combined. 

  • Transfer the batter to the loaf pan.

  • Bake the bread until a toothpick comes out clean when inserted in the center, about 55 minutes.

  • Allow the bread to cool completely before slicing.

This is the brand of pumpkin puree I like to use

This is the brand of pumpkin puree I like to use

Health Benefits of Pumpkin:

  • Pumpkin is one of the best sources of beta-carotene, which converts to vitamin A in our body. Vitamin A promotes eye health and helps our body fight infection and viruses.

  • The Beta-carotene and other carotenoids in pumpkins help with liver detoxification and can improve the tissue health of the liver

  • Pumpkin is an excellent source of fiber, keeping you feeling fuller longer and aiding with digestion

  • The carotenoids and vitamins C and E in pumpkin helps keep our skin healthy and protect it from UV rays


Sources and additional reading:

Romesco Sauce

This sauce is seriously addicting in my opinion! I only tasted romesco sauce for the first time a couple of years ago at a Mediterranean restaurant and I was obsessed. Now, I make my own at home because it’s so quick to whip up and I can know exactly which ingredients are being used. You can roast your own peppers and tomatoes, but using high quality pre-roasted ones make this process much simpler. I am a big believer that a delicious sauce makes any dish go from good to great, and this one is no exception. Try it over grilled chicken, grilled or roasted veggies, as a dip for credit, a spread for sandwiches, or to top your grain bowl with!

Served here with grilled zucchini and summer squash

Served here with grilled zucchini and summer squash

IMG_6447.jpeg

Ingredients

  • One 12-ounce jar of roasted red peppers, drained (or 2 roasted red peppers)

  • 1 12 ounce jar of fire roasted tomatoes, drained

  • ½ cup almonds (roasted or raw)

  • 1 garlic clove

  • 1 tablespoon red wine vinegar

  • 1 teaspoon smoked paprika

  • ½ teaspoon fine sea salt, to taste

  • ¼ teaspoon cayenne pepper

  • ¼ cup extra virgin olive oil

Instructions:

  1. To roast your own peppers, preheat the oven to 475 degrees F. Slice red peppers in half lengthwise. Roast for 45 minutes (flip them at 20 minutes). Let cool before handling. 

  2. If using raw almonds, toast the at 350 degrees F for 10-12 minutes. Let cool.

  3. In a blender or food processor, combine all ingredients and blend until smooth.

  4. Adjust seasonings if needed. Store in an airtight container in the refrigerator for about a week. 

This sauce features red bell peppers, which is the ingredient of the week! Read on to learn about the health benefits associated with bell peppers.

Health Benefits of Bell Peppers:

  • They are rich in vitamin C, which supports a strong immune system. The high vitamin C content is also great for skin health, rejuvenating dead cells and preventing wrinkles

  • They are an excellent source of folate and have been recommended to pregnant women to help support the development of a healthy fetus

  • Bell peppers are high in vitamin A which promotes healthy eyesight

  • They are rich in powerful antioxidants, which help fight oxidative stress and chronic disease

  • They are high is vitamin B6, which increases serotonin and norepinephrine, hormones that are associated with improved mood and higher energy levels 

Sources and additional reading:


Almond Flour and Almond Butter Banana Bread

This banana recipe is protein-packed and full of healthy fats and nutrients. Using very few ingredients and almost no added sugar, this banana bread can be enjoyed guilt-free. For an extra satisfying and hearty breakfast or snack, I top this banana bread with some almond butter (and maybe a drizzle of honey and cinnamon). In my opinion, banana and almond butter is a tough combination to beat. I hope you enjoy!

IMG_5871.jpeg
IMG_5881.jpeg

Ingredients

  • 3 large ripe bananas peeled

  • 3 large pasture-raised, organic eggs

  • 3 tbsp pure maple syrup

  • 1 tbsp melted coconut oil

  • 1/4 cup unsweetened and no-salt added creamy almond butter

  • 1 ½ teaspoons pure vanilla extract

  • 1 1/2 cups almond flour

  • 1 tsp baking powder

  • 1/2 teaspoon sea salt

  • 2 teaspoons ground cinnamon

Directions

IMG_5877.jpeg
  • Preheat the oven to 350 degrees F

  • Line a 9" x 5" loaf pan with parchment paper or grease it with coconut oil

  • In a medium sized mixing bowl, add the 3 peeled bananas. Mash them with a fork. Add eggs, and whisk until combined. Add maple syrup, coconut oil, almond butter, and vanilla to bowl. Mix until all ingredients are combined.

  • In a separate bowl, mix together almond flour, baking powder, sea salt, and cinnamon.

  • Add dry ingredients to wet ingredients and fold with a spatula until combined, without overmixing.

  • Transfer the batter to loaf pan and smooth into an even layer. Bake for about 45 minutes, or until when a knife is inserted, it comes out without batter.

  • Remove banana bread from the oven and allow it to cool before serving.

  • Serving suggestion: slice and top with almond butter or coconut oil for a delicious, guilt-free breakfast or snack

Health Benefits of Almond Butter:

  • Almond butter is an excellent source of healthy, monounsaturated fats, which are associated with reducing the risk of heart disease.

  • Almonds have high levels of magnesium, which promotes the flow of blood, oxygen, and nutrients

  • Almond butter is a great source of fiber, which helps keep blood sugar levels stable

  • Almonds contain riboflavin and L-carnitine, which can positively affect neurological activity and prevent cognitive decline.

  • Finally, they are full of healthy flavonoids (antioxidants) and Vitamin E.


Sources and additional reading:

Parsnip and Cauliflower Mash

This recipe is so simple and delicious. I love it so much, in fact, I have made it 3 times in the past two weeks! It’s perfect when serving a juicy chicken or steak as a hearty, but guilt-free side.

I love parsnips and I only really “discovered” them a few years ago. I used to see them at the supermarket and think they were just ugly, white carrots. Little did I know that this root vegetable would soon become a staple in my kitchen during the winter months due to its sweet and almost nutty flavor, and of course the fact that they contain a wealth of nutrients.

IMG_4076.jpeg

Ingredients:

  • 4 cups chicken broth

  • 2 cups water

  • 5 medium parsnips

  • 1 medium head cauliflower

  • 2 tablespoons extra-virgin olive oil, more for drizzling

  • ½ tsp salt

  • 1 heaping teaspoon minced rosemary

  • Freshly ground black pepper, to taste

Directions:

  • Peel and chop parsnips into 1 inch chunks

  • Chop cauliflower into florets

  • Bring a large pot of chicken broth and water to a boil

  • Add parsnips and cauliflower and boil for 10-12 minutes or until soft when poked with a fork

  • Strain the parsnips and cauliflower, saving 1 cup of the cooking liquid

  • Use an immersion blender or regular blender to mash the parsnips and cauliflower, adding in some of the cooking liquid to facilitate the blending

  • Add in olive oil, salt, pepper, and rosemary and mix together

Health benefits of Parsnips:

  • Parsnips are rich in potassium, zinc, magnesium, phosphorus, manganese, and iron.

  • They are a great source of folate, which is important especially for women who are pregnant (for the healthy development of child). Folate also promotes the growth of red blood cells and can prevent neurodegenerative diseases.

  • The high levels of potassium in parsnips boosts brain health and in help lower blood pressure

  • They have high amounts of soluble fiber, which aids in digestion and the balancing of blood sugar levels

  • They are high in Vitamin C, which helps boost eye health.

Sources and additional reading:

Healthy Banana "Ice Cream"

IMG_3900.jpg

This recipe literally takes two minutes to whip up. It’s a guilt-free and decadent dessert. For best results, enjoy immediately! I personally like to top mine with a drizzle of honey and a pinch of sea salt. Whenever I have bananas that are starting to lose their vibrancy, I peel them and throw them in the freezer. Then I can add them to smoothies or quickly whip up this delicious dessert when I’m craving something sweet after dinner.


Ingredients:

  • 2 slightly overripe bananas (frozen)

  • ½ cup of unsweetened almond milk

  • ½ tsp cinnamon

  • ½ tsp vanilla

Directions:

  • Blend until smooth

  • Top with your favorite toppings (honey, sea salt, maple syrup, chocolate chips, coconut flakes…)

  • Enjoy!

 
IMG_3884.jpeg

Health Benefits of Bananas:

  • They have high amounts of potassium, which is beneficial for circulatory health, lowering blood pressure, and preventing muscle cramps. Potassium also helps improve cardiovascular and kidney functioning.

  • They can be an energy booster because their carbohydrate content becomes quick-releasing sugars that your body instantly uses.

  • They can help enhance your mood! Bananas contain tryptophan, an amino acid, which produces serotonin, one of our main “happy hormones.”

  • Greener, unripened bananas are an excellent source of prebiotics. We hear a lot about probiotics (healthy gut bacteria), but we also need prebiotics, also known as resistant starch, to feed the good bacteria!


Lemony Basil Pesto

I have always loved pesto for as long as I can remember. Pesto pasta was an all-time favorite of mine as a little kid. Now I whip up my own version, which is dairy free, and I add it to everything, like my Lemony Grilled Chicken, paired with vegetables as part of a crudite platter, or dolloped on top of a quinoa bowl.

I also used to think pesto was so unhealthy and high in calories! Now, I know that it’s actually full of healthy fats, especially when using a high quality extra virgin olive oil. Mine includes pine nuts (high in manganese, magnesium, monounsaturated fat, and Vitamins E and K) and fresh lemon juice (a powerful detoxifier). Hope you enjoy it as much as I do!

IMG_3697.jpeg

Ingredients

  • 4 cups loose basil leaves

  • 3 tablespoons pine nuts (or ¼ cup walnuts)

  • 3 tablespoons extra virgin olive oil

  • 1 garlic clove

  • Juice from 1 lemon

  • ¼ teaspoon sea salt

  • ⅛ tsp pepper

Directions:

  • Place all ingredients in a blender or food processor and blend until smooth.

Paired with lemony grilled chicken and veggies

Paired with lemony grilled chicken and veggies

Enjoyed with grain-free Mary’s Crackers

Enjoyed with grain-free Mary’s Crackers

Lemony Grilled Chicken

Paired with sautéed Swiss chard, roasted potatoes and onions, and my Lemony Basil Pesto

Paired with sautéed Swiss chard, roasted potatoes and onions, and my Lemony Basil Pesto

This chicken recipe requires a simple marinade and then you can choose to grill, pan sear, or roast. I personally love the char that comes from grilling it, which helps seal in the moisture and adds great flavor. I personally love pairing this chicken with my Lemony Basil Pesto for a bright and bold taste!

I love cooking with lemon because the flavor-enhancing citrus fruit is also a nutritional powerhouse! Just remember, when zesting lemons or putting lemon slices into water, use organic lemons! You don’t want the pesticides and chemicals interfering with the health benefits.

Ingredients:

  • 2 pounds chicken breasts (I prefer skin on for added flavor)

  • 1/3 cup olive oil

  • Juice of 2 lemons

  • Zest of 2 lemons

  • 4 cloves garlic, minced

  • 1/4 cup chopped fresh basil (loosely packed)

  • Salt and fresh ground pepper, to taste


Directions:

  • Preheat grill

  • In a large ziploc bag, combine olive oil, lemon zest, lemon juice, garlic, and basil.

  • Salt and pepper both sides of chicken and then add to ziploc bag. Shake it up so the marinade covers chicken.

  • Marinate for about 4 hours or overnight.

  • Place marinated chicken on the hot grill for about 6 minutes a side (timing depends on thickness of chicken breasts) or until a meat thermometer reads 165 degrees Fahrenheit.

  • Remove chicken from grill; cover and let rest for 5 minutes before cutting.

  • Serve with lemony basil pesto and garnish with fresh lemons


Health Benefits of Lemons:

  • Lemons are acidic, but once ingested, they are alkalizing and help to restore balance to the body’s pH.

  • They are rich in vitamin C and flavonoids (antioxidants), which boost your immune system

  • Lemons help detoxify your liver and flush out toxins

  • Lemons help with digestion and the regulation of bowel movements

  • They have anti-aging agents, helping our skin to look and feel younger

  • They help our bodies to absorb the iron in foods, which many of us (especially vegetarians) are deficient in


Sources and Extra Reading:

https://www.edisoninst.com/15-benefits-of-drinking-lemon-water-in-morning-empty-stomach/

https://draxe.com/lemon-nutrition/

https://www.getthenewlife.com/blog/lemons-are-truly-a-superfood/

https://www.mindbodygreen.com/0-4769/Why-You-Should-Drink-Warm-Water-Lemon.html

https://www.zliving.com/beauty/anti-aging/lemon-anti-aging-friend-8565/


Crispy Turmeric Chickpeas

Tumeric has gotten a lot of press and hype over the past year or so, and there’s reason for it! While it is typically used in Indian cuisine, it can be incorporated into your everyday cooking in order to reap the many benefits it has to offer. Here is my recipe for crispy turmeric chickpeas. They are quick to cook up, and are perfect for snacking or for topping soups and salads with!

Ingredients:

IMG_3536.jpg
  • 1 15-ounce can of chickpeas

  • 2 tbsp olive oil

  • ½ tsp turmeric

  • ½ tsp curry powder

  • ½ tsp salt

  • ½ tsp black pepper

Directions:

  1. Preheat oven to 400 degrees.

  2. Drain chickpeas, wash and dry thoroughly. Remove any skin that comes off.

  3. In a bowl, mix together the olive oil and spices.

  4. Add chickpeas to the mixture and toss to combine.

  5. Place coated chickpeas on a baking tray and bake for about 25- 30 minutes

  6. Remove from oven, sprinkle with some sea salt, and set aside to cool so they become crispy.

NOTE: This recipe can easily be doubled or tripled! You can store them in an airtight container for up to two days.

Health Benefits of Turmeric:

IMG_3535.jpg
  • The active ingredient in turmeric is curcumin, which is a powerful anti-inflammatory agent. Most western diets are comprised of heavily processed foods which can lead to chronic inflammation. Turmeric helps combat this!

  • The anti-inflammatory curcumin can also help with relieving symptoms from joint pain and

  • It supports healthy cholesterol levels

  • It has anticancer effects, killing existing cancer cells and reducing the growth of new ones

  • It may slow and prevent blood clots

For more information about the health benefits of turmeric, check out these sites:


Mustardy Kale Salad

This kale dish is inspired by my amazing salad I had at the Jimtown Store in Healdsburg this past weekend and also by the Ottolenghi recipe in his new cookbook, “Simple.” This is great served as a side topped with goat cheese or feta (for those eating dairy). You can also top this avocado and quinoa for a great #meatlessmonday main course!

Kale has become quite the trendy veggie over the last few years. There’s a reason for it! It’s packed with nutrients and it’s a super versatile ingredient to cook with. Some people can have a hard time digesting raw kale (like me!) so think about cooking it or massaging it to break down the tough fibers. Yes, massaging kale really is a thing - and it truly helps make it tastier and easier to consume and enjoy!

Health Benefits of Kale:

  • Kale has even more iron than beef (per calorie)! Iron helps form enzymes, cellular growth, and liver function among other things

  • Kale has more calcium than milk (per calorie)! Calcium is important for bone health and helping blood vessels move throughout the body.

  • It’s great for digestion with its high amount of fiber, plus the stems are full of prebiotics (they feed our probiotics), which promotes good gut health

  • It is an anti-inflammatory food with about a high amount of omega 3s

Ingredients (Serves 4 as a side)

  • 1 bunch of kale (about 10 stems)

  • 3 tbsp olive oil

  • 1 tbsp sherry vinegar (or another vinegar of your choice)

  • 2 tsp whole grain mustard

  • Juice from 1/4 of a lemon

  • Salt and pepper to taste

  • ¼ cup toasted pumkin seeds

  • Sprinkling of dried tart cherries (or cranberries)

Directions:

  • Wash and dry kale. Remove kale from stems (save them for sautéing) and chop the leaves roughly.

  • Add all ingredients (but pumpkin seeds and cherries) to a bowl with the kale leaves and massage with your hands for about a minute or until kale softens

  • Let the kale salad rest for about 20 min before serving.

  • Add pumpkin seeds and cherries and serve

  • Option: Add cooked quinoa, avocado, and goat cheese for a substantial entree

IMG_3357.jpeg
IMG_3339.jpeg

For more information about the benefits of kale, check out these websites:

  • https://draxe.com/health-benefits-of-kale/

  • https://www.mindbodygreen.com/0-4408/Eating-Kale-Top-10-Health-Benefits.html

Lentils with Spiced Carrots and Cauliflower

This is a super easy weeknight meal that is packed with flavor! It is perfect for vegetarians and meat eaters too. I always make extra so I can add this to salads for leftover lunches.

IMG_3035.jpeg

I love cooking with lentils because they’re highly nutritious and an excellent source of plant-based protein. They are super versatile and they add great texture and flavor to any meal. There are several different varieties, but they are all similar in their nutritional components. I prefer soaking lentils before cooking with them to increase their digestibility and to remove the lectins (which can cause inflammation and leaky gut). There will be more about the importance of soaking grains and seeds in a future post, but for now let’s focus on lentils!

Health benefits of lentils:

  • They are a great source of protein and iron, making them a great vegetarian option

  • They are high in folate and magnesium, which are essential for heart health

  • They are high in manganese, B vitamins, zinc, and potassium

  • They have high amounts of fiber, which is important for stable blood sugar levels and for healthy digestion

  • They are high in polyphenols, which have important antioxidant and anti-inflammatory properties


Ingredients:

  • 1 cup dried green lentils

  • 2 cups chicken or veggie broth

  • 1 bay leaf

  • 1 head cauliflower, cut into florets

  • 4 carrots, chopped into ¼ in. pieces

  • 1 can chickpeas rinsed and drained

  • 1/2 teaspoon ground cumin

  • 1/4 teaspoon freshly ground black pepper

  • ½ tsp salt

  • 1/4 teaspoon turmeric

  • 2 tbsp olive oil + more for finishing

  • Feta to garnish


Directions:

  • Preheat 425 degrees

  • Rinse lentils thoroughly, and place in a medium pot with broth and bay leaf.

  • Bring to a boil and reduce to a simmer. Simmer for 25 minutes (covered) or until just tender.

  • Remove the pot from the heat, and keep covered for another 10 minutes.

  • While lentils are cooking, mix cauliflower and carrots with cumin, turmeric, salt, pepper, and olive oil. Arrange on baking sheet and roast for 25-30 minutes.

  • Mix lentils with cauliflower, carrots, and chickpeas- drizzle with good olive oil and top with feta crumbles.


Cauliflower and carrots roasted with spices

Cauliflower and carrots roasted with spices

The finished product with a garnish of arugula

The finished product with a garnish of arugula

Grain- Free Chocolate Coconut Bites

I am obsessed with these chocolate coconut bites! They are my go-to guilt-free dessert these days. They taste like chocolate macaroons but are made with ingredients you can feel good about eating! There are only 2 tbsp of maple syrup in the entire recipe, yet the dessert bites still taste decadent and rich. Also, they take about 5 minutes to make. So simple!

Ingredients

  • 1 tbsp coconut oil

  • 3 tbsp unsweetened cocoa powder

  • 2 tbsp pure maple syrup

  • 1 tbsp + 1 tsp almond butter

  • 1 cup unsweetened shredded coconut

  • ½  tsp vanilla

Directions

  • Melt coconut oil in a small saucepan over medium heat

  • In a mixing bowl, add all ingredients

  • Roll into 1 1/2 inch balls and place into a container.

  • Store in the fridge or freezer.

IMG_2815.jpg

Nut Butter Energy Balls

IMG_2816.jpg

These energy balls are so easy to make and are the perfect grab-and-go snack. I eat these in the afternoon if I need a little pick me up or some energy before a work out. They’re also perfect for breakfast, paired with a piece of fruit. While they can be a little messy to make, there are only a handful of ingredients and one mixing bowl needed. I hope you enjoy these as much as I do :)

Ingredients: (makes 10 balls)

  • 1 cup shredded coconut (or oats)

  • ½ cup flaxseed meal

  • ½ cup almond butter (or nut butter of your choice)

  • 1 tsp vanilla

  • ½  tsp cinnamon

  • 3 tbsp honey or maple syrup


Directions

  • Mix all together and roll into balls

  • Place balls in freezer to set for one hour and then enjoy!

I keep my energy balls in the freezer, but they can also be stored in the refrigerator once they’ve set.


Tea time with sunbutter energy balls

Tea time with sunbutter energy balls

IMG_2066.jpeg

Roasted Cauliflower Winter Salad with Lemon Tahini Dressing

IMG_2468.jpg

This vegetable was featured as an “Ingredient of the Week” for good reason! Not only is it packed with nutrients, it’s incredibly versatile, hearty, and delicious.

Health Benefits:

  • Cauliflower is a cruciferous vegetables family — along with broccoli, cabbage, kale, and brussels sprouts, which are all known for their high levels of phytochemicals, which are natural antioxidants

  • They are correlated with the prevention of many chronic diseases, such as cardiovascular diseases, diabetes, neurodegenerative disorders, and many forms of cancers

  • They reduce inflammation (main cause of chronic disease) by lowering oxidative stress

  • They are chock full of beneficial vitamins and minerals, like vitamin C and vitamin K

  • They are beneficials for digestion and detoxification

Recipe inspiration: Roasted Cauliflower Winter Salad with Lemon Tahini Dressing. Again, I love roasted cauliflower on its own, roasted simply with olive oil, salt, and pepper, and occasionally some cumin if I’m feeling adventurous.

However, given that I am somewhat obsessed with tahini dressing and, this salad has become a winter staple.The variety of flavor profiles and texture makes it impossible to resist. The peppery arugula mixed with the caramelized roasted onions and cauliflower, the brininess from the capers, and the sweetness from the dates, brings perfect balance to this dish. Every bite is unique and packed with flavor, leaving you wanting more. I love the crunch of the pumpkin seeds and the creaminess of the tahini dressing. It’s the perfect main course, if you want to add some roasted chicken and/or avocado for a little more substance. It’s also excellent when served as a side dish.

Ingredients (serves 4 as a side)

For the Salad:

  • 1 large head of cauliflower, cut into florets

  • 2 large handfuls of arugula

  • 1 red onion, cut in half, and then cut into ⅛ in. thick slices

  • ¼ cup of toasted pumpkin seeds

  • 2 tbsp capers, drained

  • 3 dates, pitted and chopped

  • 3 tablespoons avocado oil

  • Salt and pepper to taste

Tahini Dressing Ingredients:

  • ¼ cup tahini

  • Juice of 1 ½  lemons

  • 1 ½  tbsp extra-virgin olive oil

  • ¼ teaspoon sea salt

  • ¼ tsp pepper


Directions:

  • Preheat oven to 400 degrees

  • Coat cauliflower and red onion in avocado oil, salt, and pepper

  • Place on baking sheet and roast in the oven for 25 minutes or until lightly browned

  • Meanwhile, whisk together all ingredients for tahini dressing, adding warm water if necessary, to create a somewhat liquidy consistency

  • Assemble the remaining ingredients in a bowl- arugula, capers, dates, and pumpkin seeds

  • Once cauliflower and red onion is cooled, add to salad, toss with dressing, and enjoy!

IMG_2470.jpg

Sweet Potato "Toast" with Avocado

IMG_2353.jpg

Today is my first post for….drumroll…ingredient of the week! I am excited to announce my newest idea to inspire recipe creativity and an understanding for the various health benefits associated with the foods we eat. Each week, I will introduce the ingredient, explain its health benefits, and give you at least one recipe. Ready!? Our first ingredient of the week is the sweet potato!

Health Benefits:

  • Sweet potatoes are rich in vitamins A and C, which are essential for immune support.

  • They are anti-inflammatory and easy to digest

  • They are high in fiber (keeps you full, doesn’t spike blood sugar, helps alleviate constipation)

  • They help regulate blood pressure with their high levels of potassium

  • Their naturally sweet flavor reduces sugar cravings


Recipe inspiration: Sweet Potato “Toast” with Avocado

I love roasted sweet potatoes on their own, cut into ¼ cubes or “fries,” but this recipe has a little more flare and flavor! These sweet potato “toasts” are perfect for breakfast or a snack. The starchy, fiber-rich sweet potato topped with a heaping amount of creamy avocado will keep you full and satisfied. If you’re feeling extra ambitious (or hungry), top your “toast” with a fried egg.

Ingredients: (Serves 4)

  • 1 large sweet potato

  • 2 ripe avocados

  • 1-2 tbsp extra virgin olive oil

  • Salt to taste

  • Pepper to taste

  • Red pepper flakes to taste

Directions:

  • Preheat oven to 400 degrees

  • Slice the ends off the sweet potato and then slice the sweet potato lengthwise into ¼ inch slices

  • Coat with olive oil and a sprinkling of salt and pepper

  • Place on baking sheet and place in the oven

  • After 12 minutes, flip the “toasts”

  • Roast for 12 more minutes or until browned and the flesh is soft when touched with a fork

  • While “toasts” cool, mash the avocado in a small bowl

  • Spoon the avocado on top of the toasts

  • Drizzle the tops with sea salt, pepper, and red pepper flakes

IMG_2347.jpg
IMG_2348.jpg
IMG_2349.jpg
IMG_2352.jpg

Almond Milk Oatmeal with Bananas

IMG_2245.jpg

This is my go-to breakfast recipe, especially when I want something warm and comforting. This oatmeal is not only quick and deeply satisfying, it’s nutrient-rich and filling, making it the perfect way to start your day. Oats are naturally gluten-free and a fiber-rich carbohydrate, as long as you’re using high quality, non-processed oats like those from Bob’s Red Mill (my personal favorite). They are also loaded with vitamins and minerals, including: manganese, magnesium, zinc, iron, and folate. Also, whole oats are high in polyphenols and antioxidants, essential for keeping your immune system healthy. Finally, they are rich in soluble fiber, which is beneficial in stabilizing glucose levels (your energy levels won’t spike then drop) and in keeping healthy cholesterol levels.

Now that you know the benefits, time to learn how to make this simple and delicious recipe. The combination of banana and almond milk make this oatmeal creamy and sweet; you won’t need to add in brown sugar and other sugar additives.

Ingredients (serves 4)

  • 2 cups almond milk

  • 2 cups water

  • 2 cups gluten-free old fashioned rolled oats

  • 2 ripe bananas

  • ½ tsp cinnamon

  • ⅛ tsp salt

Directions:

  • Bring almond milk, water, and salt to a boil in a saucepan

  • Add in oats and bring to a simmer

  • Stir occasionally for 5 minutes

  • Add in bananas (sliced) and continue to cook (while stirring occasionally) for 5 minutes or until oats are soft and liquid has been mostly absorbed

  • Turn of heat and stir in cinnamon

  • Serve immediately

  • Top with fresh fruit, honey, or just enjoy as is!

Gluten-Free Apple Crisp

It’s hard to believe how delicious this alternative apple crisp can taste considering there are so few ingredients and almost no added sugar! You will get all the satisfaction you are seeking from a hearty apple pie, but with no guilt and with no digestive issues from inflammatory ingredients. It’s a win win! I love to top this with full-fat coconut yogurt or coconut ice cream. Mmmm I’m salivating as I write this. Luckily, Thanksgiving is right around the corner, and this will definitely be present on our dessert table :)


Easy substitutions:

  • You can swap the apples for any seasonal fruit of your choices (plums, peaches…)

  • You can use almond flour instead of coconut flour

  • Can can add chopped almonds the the crumb topping for added nuttiness


Ingredients

  • 4 medium sized apples (preferably local!)

  • ½ cup coconut flour

  • ¼ cup coconut flakes

  • 4 dates pitted

  • ½ lemon, juiced

  • 1 tsp cinnamon

  • ⅛ tsp salt

  • 2 tbsp coconut oil (melted)

  • 2 tbsp honey or maple syrup


Directions

  • Preheat oven to 350

  • Slice 4 apples into thin slices and place in baking dish

  • Mix in ½ tsp cinnamon and juice of half a lemon

  • To make the crisp, add: coconut flour, coconut flakes, dates, ½ tsp cinnamon, salt, coconut oil, and honey

  • Blend ingredients together and crumble on top of apple mixture

  • Cover with foil and bake for 25 min

  • Take off foil and bake for 20 more mins

IMG_1163.jpg
IMG_1214.jpg

Roasted Beet Dip

This is the perfect starter if you serve appetizers before your Thanksgiving meal, but it’s really great anytime of year as an alternative to hummus for dipping and snacking. This has been a MAJOR crowd pleaser at the past couple of dinner parties I’ve had, and for that reason, I’m posting the recipe here for you all to enjoy! Roasting the beets before blending them adds a rich, sweet, earthy flavor that is so deliciously satisfying. Serve this up with some thick-cut roasted delicata squash or sweet potato fries. Or consider just serving it next to some store bought hummus, crackers, celery, and carrots for a sophisticated twist on a crudite platter. Your guests will be impressed!

Health Benefits of Beets:

  • Beets are rich in betalains (a phytonutrient responsible for the pigmentation in beets), which have powerful antioxidant and anti-inflammatory properties

  • Beets help keep your liver healthy so it can continue to get rid of toxins in your body

  • They are naturally sweet, especially after roasting, and eating sweet vegetables and fruits can reduce your sugar cravings

  • They have high levels of phyto-nitrates, which helps your body lower and maintain healthy blood pressure levels. These phyto-nitrates also boost athletic performance and brain function.

  • They are full of essential nutrients and minerals, like magnesium, potassium, copper, iron, phosphorus, Vitamins A, B, and C

Ingredients

  • 4-5 medium sized beets, washed and dried

  • 1 clove of garlic

  • Juice from half of a lemon

  • ¼ cup of good quality olive oil

  • Salt and pepper to taste

Directions

  • Preheat oven to 375

  • Cut beets into ¼ inch wedges and mix with a drizzle of olive oil, some salt and pepper

  • Roast at 375 for 45 min to an hour, until soft when poked with fork

  • Put roasted beets with remainder of ingredients in a blender and pulse until a paste forms

  • If mixture needs more moisture, add some olive oil, water, or lemon juice until it reaches the consistency you like

Ingredients needed

Ingredients needed

Beets ready to be roasted

Beets ready to be roasted

Served here with roasted delicata squash

Served here with roasted delicata squash

Beet dip served next to hummus and leftover chimichurri sauce

Beet dip served next to hummus and leftover chimichurri sauce

Grain Free Stuffing

For anyone who is eating gluten-free, paleo, or wants a healthier substitute for stuffing, this recipe is for you! It’s packed with the essential Thanksgiving flavors, like sage, rosemary, thyme, and garlic. It’s filling and will help make you feel “stuffed” with the starchy vegetables like sweet potatoes and parsnips. Finally, the fattiness from the sausage rounds out all the flavors to make this hearty stuffing the perfect pairing for your turkey dinner. Not to mention, it’s simple to make and you can prep it in advance to clear up some oven space!

Ingredients

  • 1 lb of organic pork sausage without the casing, crumbled

  • 3 large sweet potatoes

  • 8-10 parsnips

  • 2 yellow onions, peeled and diced

  • 2 apples (honeycrisp or another tart variety), peeled and cut into cubes

  • 5 stalks of celery, washed and cut into ½ inch pieces

  • 6 cloves of garlic, minced

  • 7-8 tbsp of olive oil, coconut oil, or avocado oil

  • 1 tbsp dried sage (or 2 tbsp fresh)

  • 2 tsp salt

  • 1sp dried rosemary

  • 1 tsp dried thyme

  • 1 tsp dried oregano

  • 1 tsp black pepper

Directions

  • Heat oven to 375

  • Wash and peel turnips; cut into ½ inch wide pieces

  • Wash and dry sweet potatoes; cut into ½ inch wide pieces

  • Coat the sweet potatoes and turnips in about half the oil and half the spices; then roast on two separate baking dishes so vegetables are in an even layer; roast for 45 minutes to 1 hour, until vegetables are soft when poked with a fork and a little browned

  • When root vegetables are cooking, heat oil in a pan over medium heat

  • Add sausage and stir; once browned, remove from pan into a bowl

  • Add remainder of the oil and add onions and celery; stir and cook until softened

  • Add remainder of the spices and apple and cook for 3-4 minutes

  • Mix together ALL ingredients in a large bowl and serve immediately (or make ahead and warm in the oven before serving)

AIP Pumpkin Bars

I am completely pumpkin obsessed! However, for the past month, I’ve been on a strict autoimmune paleo (AIP) healing protocol, which is basically an intense elimination diet. The reason for it is to heal my Leaky Gut and try to prevent getting a full-blown autoimmune disease, especially since I already have hypothyroidism. It was super challenging for me to get my pumpkin fix because of the restrictions I was facing in my diet, but thankfully I found inspiration from AIP bloggers to create these DELICIOUS pumpkinny treats. I even served them at a girls night last week and they were a huge success! They are guilt free and easy to make. Enjoy :)

IMG_1549-2.jpg
IMG_1552.jpg


Ingredients

  • 2 ripe bananas

  • ½ cup pure pumpkin puree

  • ⅓  cup coconut oil (melted)

  • 3 tbsp maple syrup

  • 1 cup tigernut flour (https://thrivemarket.com/p/organic-gemini-organic-tigernut-flour)

  • ¼ cup coconut flour

  • 1 tbsp cinnamon

  • ½ tbsp pumpkin pie spice (for non-AIP - otherwise ½ more tbsp cinnamon)

  • 1 tbsp vanilla extract

  • ½ tsp baking soda


Directions

  • Preheat oven to 350 degrees

  • Grease an 8x8 baking dish with coconut oil

  • Mash bananas in a bowl with a fork

  • Add pumpkin puree and mix

  • Add coconut oil, maple syrup, vanilla and mix

  • In a separate bowl, add coconut flour, tigernut flour, baking soda, cinnamon and pumpkin pie spice and mix well

  • Combine all ingredients and mix well

  • Spread mixture in baking dish and bake for 35-40 minutes

  • Let cool before serving